This is a minimal Server installation version, mainly just to run WordPress on VPS, editing a few basic lines is enough)
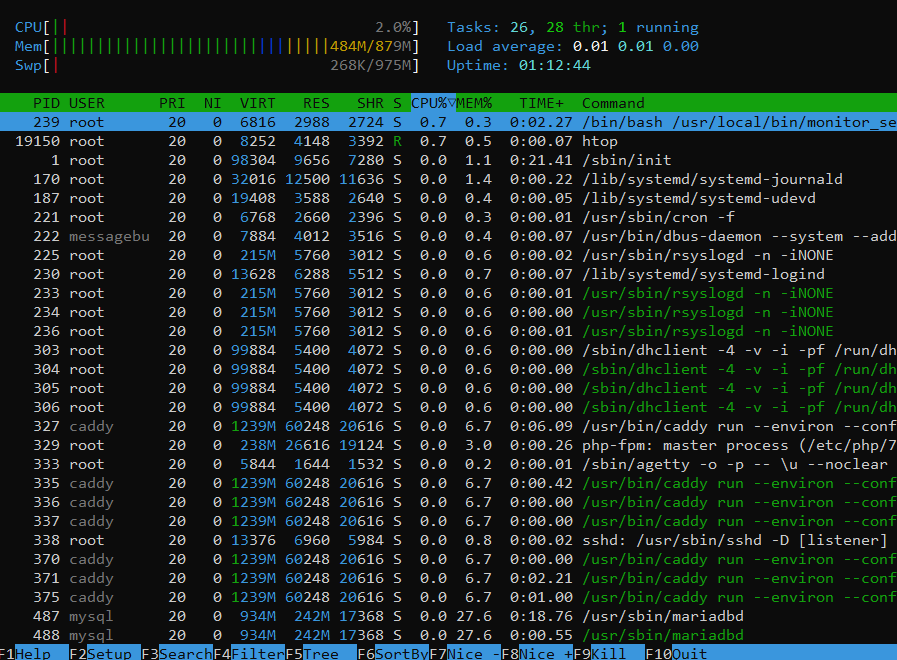
The first reason is that I just learned about Reinstall OS, and coincidentally saw that Debian 12 only uses about ~100 RAM when it’s just initialized other OSes use around 150-200MB RAM before doing anything, using Debian is saved 50-100MB RAM without having to do anything (if you want to save more, you can use Debian 11, which only uses about 60-70MB of RAM when it’s first initialized)
Next, I chose Caddy webserver, very little domain configuration, SSL and HTTP/3 support, no need to tweak anything, on WordPress it runs stably and smoothly
PHP is currently using v7.4, because the plugins available on the market, using PHP 8.2, sometimes run errors, and I don’t want to waste time on these things, when PHP 8.2 is popular, I will change back later.
In terms of performance, through the loader.io test, PHP 8.2 is about 5% compared to PHP 7.4, under the condition 50 people connected continuously access the database, when a few people access it there is almost no difference
To optimize the amount of RAM using MariaDB is an understandable choice, but choosing which version is a bit hesitant, while googling I found AWS RDS has also just updated to MariaDB 10.11, a world-class company, that needs super high stability for customers, they are confident to upgrade to 10.11, there is no reason for end users to use an older version =))
After bragging about all the above, the default LCMP minimal configuration of markknow.com is as follows:
- Debian 11/12
- Caddy v2.8.4
- PHP 7.4.33
- MariaDB 10.11.8
Install LCMP Minimal
Mostly use default parameters, only change things that I find really effective, quite similar to the article. LCMP settings Previously, in the old post I fully explained the installation commands, if you are interested you can read it, in this post I will only briefly go through the installation part, without further explanation.
- Update OS and reboot VPS
sudo apt update && sudo apt upgrade -y && sudo reboot
- Install LCMP Minimal (support x86_64, ARM64, IPv4)
sudo wget https://go.markknow.com/lcmp-minimal -O server.sh && sudo chmod +x server.sh && sudo ./server.sh
Install WordPress
1. Create Caddy WordPress configuration file
Replace example.com with your domain in the code below
nano /etc/caddy/conf.d/example.com.conf
- Fill in the content below
www.example.com {
    redir https://example.com{uri}
}
example.com {

# Set this path to your site's directory.
    root * /var/www/example.com/htdocs
# ssl cloudflare
#    tls /etc/ssl/example.com.pem /etc/ssl/example.com.key

     encode zstd gzip

    @disallowed {
       path /xmlrpc.php
        path /wp-content/uploads/*.php
    }

    rewrite @disallowed /index.php

    # Serve a PHP site through php-fpm
    php_fastcgi unix//run/php/php7.4-fpm.sock


    @static {
        file
        path *.css *.js *.ico *.woff *.woff2
    }
    handle @static {
        header Cache-Control "public, max-age=31536000"
    }

    @static-img {
        file
        path *.gif *.jpg *.jpeg *.png *.svg *.webp *.avif
    }
    handle @static-img {
        header Cache-Control "public, max-age=31536000, immutable"
    }


    # Enable the static file server.
    file_server {
    precompressed zstd gzip
        index index.html
    }


    log {
        output file /var/log/caddy/ssl_access.log {
            roll_size 100mb
            roll_keep 3
            roll_keep_for 7d
        }
    }
}
Ctrl+O -> Enter -> Ctrl+X to save and exit.
- Restart Caddy
systemctl restart caddy
2. Install WordPress
Replace example.com with your domain in the code below
mkdir -p /var/www/example.com/htdocs
cd /var/www/example.com/htdocs
wp core download --allow-root
wp core config --dbhost=localhost --dbname=wordpress_database_name_99999 --dbuser=wordpress_user_99999 --dbpass=password_pass_99999 --allow-root
chown -R caddy:caddy /var/www/example.com/htdocs
find . -type d -exec chmod 755 {} ;
find . -type f -exec chmod 644 {} ;
Now you can type domain example.com Go to browser to set up admin account
3. Setting Jetpack Photon (used on domain api.example.com)
Replace api.example.com with your domain in the code below
nano /etc/caddy/conf.d/api.example.com.conf
- Fill in the content below
api.example.com {
#    tls /etc/ssl/example.com.pem /etc/ssl/example.com.key
    handle_path /* {
        rewrite * /example.com/wp-content/uploads/{uri}
        reverse_proxy https://i0.wp.com {
        header_up Host {upstream_hostport}
        }
    }
}
- Restart Caddy
systemctl restart caddy
Want to create another page? run the steps in sequence and create a new database
# setup database
db_pass_root="Thisisdbrootpassword"
db_name="wordpress_database_name_new"
db_user="wordpress_user_new"
db_pass="password_pass_new"
mysql -uroot -p${db_pass_root} -e "CREATE DATABASE ${db_name} DEFAULT CHARACTER SET utf8mb4 COLLATE utf8mb4_unicode_ci"
mysql -uroot -p${db_pass_root} -e "GRANT ALL ON ${db_name}.* TO '${db_user}'@'localhost' IDENTIFIED BY '${db_pass}'"
High configuration VPS
The default configuration of LCMP Minimal is for VPS < 1 GB RAM, 1 vCore. If you use a VPS with more vCore and more RAM, you can edit it a bit.
nano /etc/php/7.4/fpm/pool.d/www.conf
You will see 2 lines below
pm = dynamic
pm.max_children = 6
- Switch to use
static,pm.max_childrencan be set equal to or x2 the number of vCores available
pm = static
pm.max_children = 4
Next type again
nano /etc/php/7.4/fpm/php.ini
Scroll down to see information related to Opcache cache
(opcache)
opcache.enable=1
opcache.enable_cli=1
opcache.memory_consumption=128
opcache.interned_strings_buffer=8
opcache.max_accelerated_files=100000
opcache.max_wasted_percentage=10
- On WordPress, the amount of PHP code is usually small, 128MB is enough, you can observe through plugins like WP OPcache if you see that you are using almost 100MB, and your VPS has extra RAM, you can increase it.
opcache.memory_consumption=256
opcache.interned_strings_buffer=16
- After editing, you need to reset PHP for the changes to take effect.
systemctl restart php7.4-fpm
On VPS 4 vCore and 4GB RAM I usually use this configuration, VPS 1 GB RAM uses default settings
Speedtest – Basic Test
Tested on UpCloud VPS – Developer plans – €4.5/mo running latest WordPress v6.6, default theme, no caching of any kind, domain using haproxy.tech
- OS Debian 11
- 1 CPU
- 1GB RAM (849MB)
- 20GB HDD
- Location: Singapore

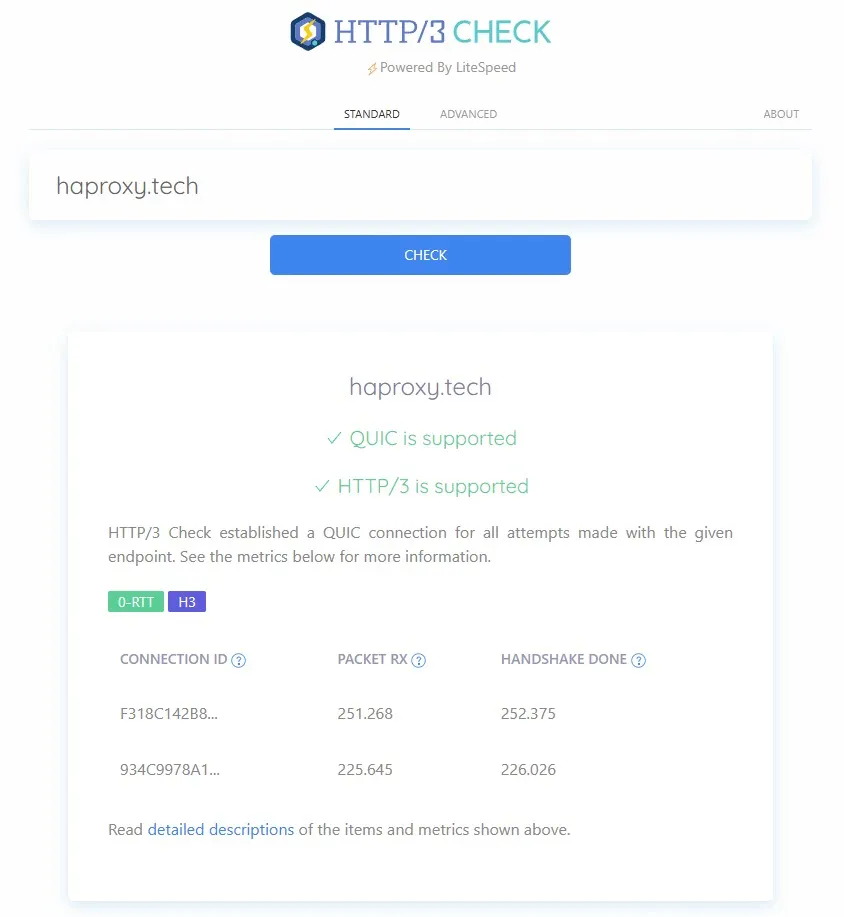
Caddy supports http/3 by default very stable

In the Caddy configuration file, I prioritize compressing static files (.js .css) via zstd, the reason is when reading reviews, I see people praise zstd for compressing a little better than gzip, it doesn’t make much sense.

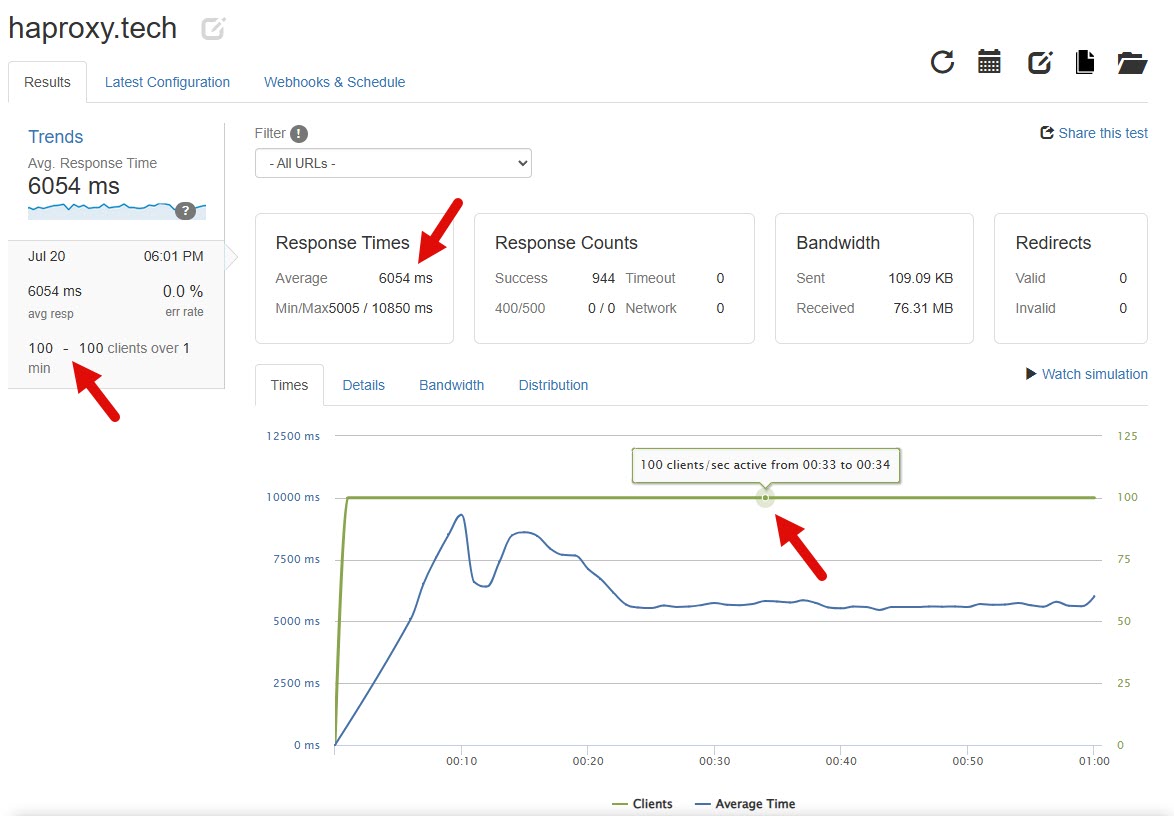
Testing on the loader.io test is quite rough with 100 continuous connections per second, it can still complete the test with an average speed of about 6s, quite similar to Webinoly
Advantages and disadvantages of LCMP Minimal
LCMP Minimal no different from the original version LCMP formerly, just switched to using Debian OS so the commands, server administration are familiar, use less RAM, the rest is quite similar
If you use this LCMP Minimal version, I recommend using it as well.
- SSL from Cloudflare
- Releem Additional configuration for MySQL
- Monitor service PHP, Mysql, Nginx Helps to automatically restart the service if an error occurs.
The pros and cons of LCMP Minimal go hand in hand, since it only installs the bare minimum, it is extremely lacking in features, if not completely lacking no features at all if you want anything you have to install it yourself
In return for this, it will rarely have errors, and once installed, you rarely need to look at the server again.

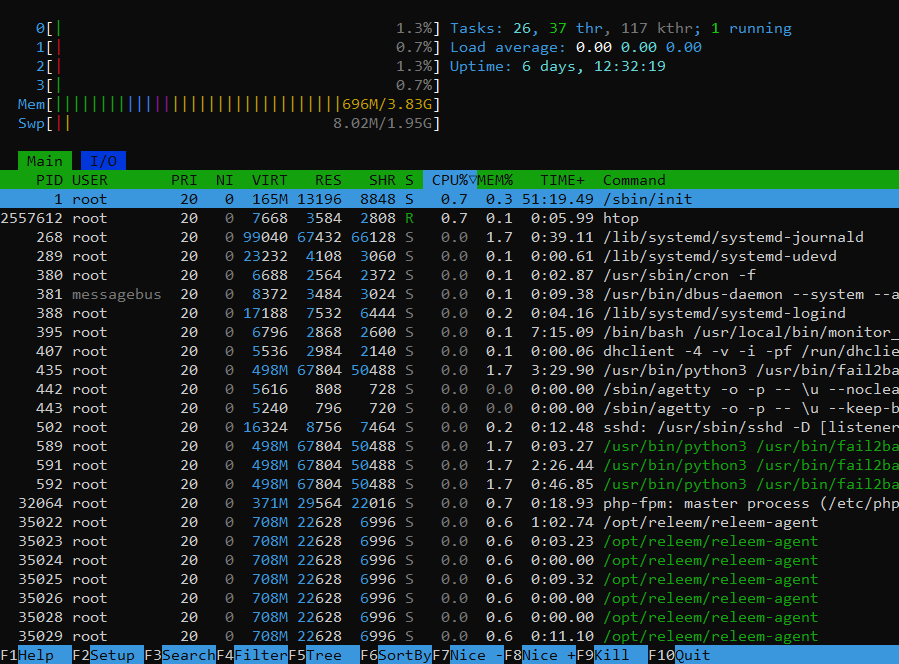
After installing all the above, markknow.com uses around ~700MB RAM on a 4GB RAM VPS. The heaviest activity is when Simply Static Pro creates static files and Duplicator Pro creates page backups. The amount of RAM used can be up to ~950MB.

On a VPS with 1 GB RAM, it usually uses about 500MB. The heaviest activity is when Simply Static Pro creates static files and Duplicator Pro creates page backups. The amount of RAM used is around ~550MB.

MySQL after being tweaked by Releem for 5-7 days, will mostly pull MySQL Latency down to below 2ms, personally quite satisfied with this number
After 15-30 days, when all database-related configurations are completely stable, you can turn off Releem to make it lighter, reduce the need to save check logs…
Summary
This is the server installation version that I am quite satisfied with and am using for markknow.com because it only installs the core things, the installation time is very fast, about 2-3 minutes, the configuration is super simple, light, smooth, enough to use on basic blog-like WordPress sites
Quite confident to introduce everyone to use this installation
