
With technical articles, especially in programming, Devops, the display of source code (Snippet code) is clear and easy to read is extremely important, helping readers to read easier and easier to understand.
In this article I will introduce the plugin Syntax-highlighting Code Block (with Server-side Rendering), is currently used for syntax highlighting when writing blog posts.
1. Why do I choose this plugin?
I have tried many highlight code previous plugins, but most of the plugins required Must use Block separately, Which is not compatible with the default “code” block of Gutenberg. I don’t like this, because if I missed it, I was “locked”, later I wanted to change the plugin to edit all the old articles.
After many trials, I chose to use the plugin Syntax-Highlighting Code Block (With Server-Side Rendering) With the following advantages:
- Block compatibility “code” by Gutenberg default
- The color code is direct color code on server side, help page to download faster.
- Compact: Installing is operating immediately, no need to configure cumbersome setting.
- Easy to expand via the filter.
2. Install and use the plugin
Enter Plugins → Add New In the WordPress Administration page, find the plugin: Syntax-highlighting Code Block (with Server-side Rendering)install and activate.
Then when editing the article, use Block Code to write the source code. Syntax-Highlighting Code Block plugin will automatically beautify this code
For example, below is a piece of Python code model.
import sys

class TodoItem:
    def __init__(self, task):
        self.task = task
        self.completed = False

    def mark_done(self):
        self.completed = True

    def __str__(self):
        status = "" if self.completed else "✘"
        return f"({status}) {self.task}"

class TodoList:
    def __init__(self):
        self.items = ()

    def add(self, task):
        self.items.append(TodoItem(task))

    def list(self):
        if not self.items:
            print("No tasks found.")
        for idx, item in enumerate(self.items, start=1):
            print(f"{idx}. {item}")

    def mark_done(self, index):
        if 0 <= index < len(self.items):
            self.items(index).mark_done()
            print("Task marked as done.")
        else:
            print("Invalid task number.")

def print_menu():
    print("nTodo List")
    print("1. Add task")
    print("2. View tasks")
    print("3. Mark task as done")
    print("4. Exit")

def main():
    todo = TodoList()
    while True:
        print_menu()
        choice = input("Enter choice: ").strip()
        if choice == "1":
            task = input("Enter task: ")
            todo.add(task)
        elif choice == "2":
            todo.list()
        elif choice == "3":
            todo.list()
            index = int(input("Enter task number to mark done: ")) - 1
            todo.mark_done(index)
        elif choice == "4":
            print("Goodbye!")
            sys.exit()
        else:
            print("Invalid option.")

if __name__ == "__main__":
    main()Code language: Python (python)
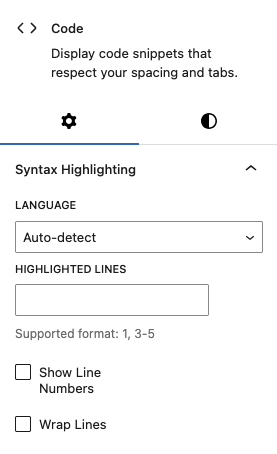
Typically, the plugin will automatically identify the language that is used in the Block. You can set up by configuring parameters for each block. In addition to choosing a language, you can choose to add features such as marking the lines to highlight, display the number of lines, …
3. Add the “Copy” button
By default, the Syntax-Highlighting Code Block plugin does not support the Copy (Copy to Clipboard) button to be able to copy the full source code with only one click. However, we can expand the plugin through the function add_filter To create more Copy button.
The author of the plugin provides a draft code for the copy button here: https://gist.github.com/westonruter/d99067473AD799DEB099334A70BDF336
I have customized it to suit the needs of use: Display the Copy button, after pressing the Copy button will appear Copied to Clipboard, and it will disappear after a few seconds.
Add the following code to the file functions.php of theme (or via Snippets code)
add_filter('render_block', 'render_block_copy_button', 10, 2);

function render_block_copy_button( $content, $block ) {
	if ( 'core/code' !== $block('blockName') || empty( $block('innerHTML') ) ) {
		return $content;
	}

	// Get the code content and prepare JavaScript
	$code = wp_strip_all_tags( $block('innerHTML') );
	$copy_icon = '<svg xmlns="http://www.w3.org/2000/svg" width="16" height="16" viewBox="0 0 24 24" fill="none" stroke="currentColor" stroke-width="2" stroke-linecap="round" stroke-linejoin="round"><rect x="9" y="9" width="13" height="13" rx="2" ry="2">rect><path d="M5 15H4a2 2 0 0 1-2-2V4a2 2 0 0 1 2-2h9a2 2 0 0 1 2 2v1">path>svg>';
	$check_icon = '<svg xmlns="http://www.w3.org/2000/svg" width="16" height="16" viewBox="0 0 24 24" fill="none" stroke="currentColor" stroke-width="2" stroke-linecap="round" stroke-linejoin="round"><path d="M20 6L9 17l-5-5">path>svg>';
	$js = "try { navigator.clipboard.writeText(this.getAttribute('data-code')); this.classList.add('copied'); this.innerHTML = '$check_icon'; const msg = this.nextElementSibling; msg.style.display = 'inline-block'; msg.style.opacity = '1'; setTimeout(() => { this.classList.remove('copied'); this.innerHTML = '$copy_icon'; msg.style.transition = 'opacity 0.5s'; msg.style.opacity = '0'; setTimeout(() => { msg.style.display = 'none'; }, 500); }, 1000); } catch (e) { this.classList.add('error'); setTimeout(() => this.classList.remove('error'), 1000); }";

	// Create the button with SVG icon and message span
	$button = sprintf(
		'<button class="code-copy-button" data-code="%1$s" onclick="%2$s" title="%3$s">%4$sbutton><span class="copy-message" style="display: none;">%5$sspan>',
		esc_attr( $code ),
		esc_attr( $js ),
		esc_attr__( 'Copy code to clipboard', 'text-domain' ),
		$copy_icon,
		esc_html__( 'Copied to clipboard', 'text-domain' )
	);

	// Wrap content and button in a container with relative positioning
	$wrapped_content = sprintf(
		'<div class="code-block-wrapper" style="position: relative;">%s%sdiv>',
		$content,
		$button
	);

	return $wrapped_content;
}Code language: HTML, XML (xml)
At the same time add this css style.css of theme (or using Custom CSS plugins)
.code-block-wrapper {
	position: relative;
}

.code-copy-button {
	position: absolute;
	top: 8px;
	right: 8px;
	padding: 6px;
	background-color: #FFF;
	cursor: pointer;
	color: #0e61aa;
	display: flex;
	align-items: center;
	justify-content: center;
	width: 30px;
	height: 30px;
}

.code-copy-button:hover,
		.code-copy-button:focus {
	background-color: #0e61aa;
	border-color: #FFF;
}

.code-copy-button.copied {
	background-color: #0e61aa;
	border-color: #FFF;
	color: #FFF;
}

.code-copy-button.error {
	background-color: #f8d7da;
	border-color: #f5c6cb;
}

.code-copy-button svg {
	width: 16px;
	height: 16px;
}

.copy-message {
	position: absolute;
	top: 8px;
	right: 42px;
	background-color: #FFF;
	color: #0e61aa;
	padding: 4px 8px;
	border-radius: 4px;
	font-size: 12px;
	white-space: nowrap;
	z-index: 10;
	display: none;
	opacity: 0;
	line-height: 20px;
}Code language: CSS (css)
You can see the demo directly on the block code in this article.
4. Highlight code in comments
Most plugins Syntax Highlighting only supports the source code in the article, not working with the source code in the comment.
Syntax-Highlighting Code Block plugin supports highlighting the source codes shared in the comment section by adding snippet:
Reference source: https://gist.github.com/westonruter/d35a909df087d90e0e0d1111ed77faa
The code in my comment is now much more beautiful.
5. Conclusion
Plugin Syntax-Highlighting Code Block (With Server-Side Rendering) Is an ideal choice for you
-
- Technical blogging on WordPress.
-
- Want to keep a simple workflow with Gutenberg’s default block.
-
- Prioritize speed, performance and compact.
See you again!
Comment Policy: We truly value your comments and appreciate the time you take to share your thoughts and feedback with us.

Note: Comments that are identified as spam or purely promotional will be removed.

To enhance your commenting experience, consider creating a Gravatar account. By adding an avatar and using the same e-mail here, your comments will feature a unique and recognizable avatar, making it easier for other members to identify you.

Please use a valid e-mail address so you can receive notifications when your comments receive replies.