To succeed in Google Advertising, you need a smart strategy and a deep understanding of the platform. Run conversions Google Ads is the “secret weapon” to optimize efficiency, minimize risks and increase campaign success. Let’s explore these secrets with MarkKnowin the article below.
What is Google Ads Conversion Advertising?
Running Google Ads conversions is a form of online advertising that focuses on driving customers to take specific actions on your website, such as making a purchase, signing up for a service, or filling out a contact form. Running conversion ads helps optimize your advertising budget by focusing on clear, measurable goals.
How does Conversion Work?
Running Google Ads conversions works by tracking user behavior after they click on your ad. This process begins when you define conversion goals in your Google Ads account. These actions can include: making a purchase, filling out a contact form, signing up for a newsletter, downloading a document, or any other action that is valuable to your business. When a user clicks on your ad and visits your website, Google Ads uses the conversion tracking code you installed on your landing page or action completion page to record their behavior. Google Ads then aggregates and reports on conversion data, providing detailed information about the performance of each ad campaign, keyword, and individual ad. Thanks to these detailed reports, businesses can accurately evaluate the effectiveness of their advertising campaigns.
Why do I need to set up Conversion Measurement?
Measuring conversions is an extremely important step in online advertising, especially on Google Ads. Setting up conversion measurement helps you track the performance of your campaigns. It provides detailed information about the quantity and quality of conversions, which in turn:
- Optimize your advertising costs by analyzing your ad keywords, ad groups, and campaigns to determine what’s driving positive results in driving customers to take valuable actions.
- Evaluate customer engagement and conversions across different devices or browsers to adjust your advertising strategy accordingly.
- Maximize conversions, target CPA, and target return on investment (ROAS) to automatically optimize campaigns according to your organization’s business goals.
Types of conversions that can be measured on a website
To run Google Ads conversions effectively, you need to understand the types of conversions. Businesses can measure different types of conversions on their websites, depending on their business goals. Some common conversion types include:
- Purchase: The customer completes the checkout process and purchases the product or service.
- Register: Customers provide personal information to register for information, newsletters or to register for an account.
- Download document: Customer downloads document.
- Contact: Customers fill in contact information or call the hotline, chat directly to request advice or support.
- Watch Video: Customers watch embedded videos on the website.
- Click on the link: Customers click on the target link/image/video,… on the landing page.
Each of these conversion types provides important information about user behavior and website performance. Track and analyze c ratioconvert help you optimize your marketing strategy and improve user experience on your website.
How to set up Google Ads Conversion Effectively
Step to Setup Google Ads
Step 1: Complete the initial Google Ads account setup
If you have already set up your Google Ads account, you can go directly to Step 2.
If this is your first time using Google Ads, please go to Google Ads and click Start now to sign in with Gmail to complete the initial account setup. The initial settings include the account name, payment method, and the first advertising content. After completing the initial settings, you can pause the advertising content that you just set to stop running.

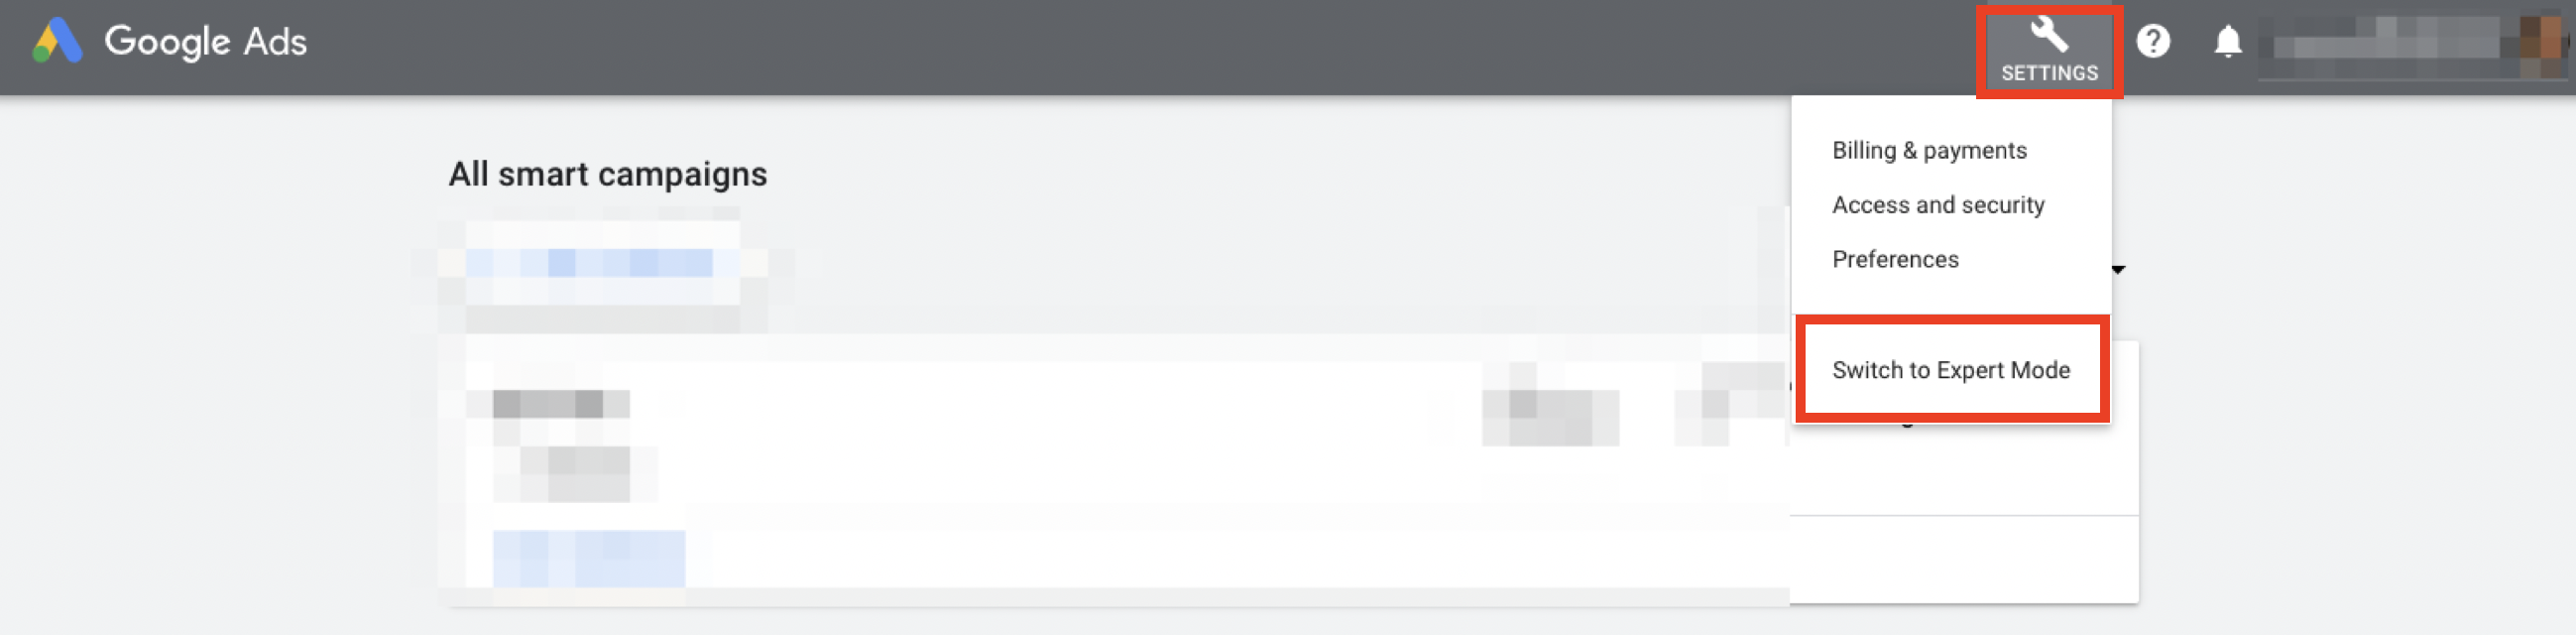
Step 2: Switch to Expert Mode
After completing the initial setup of your ad campaign and store information, please go to [SETTINGS] > [Switch to Expert Mode] at the top right to get conversion tracking codes and the full functions of Google Ads.
If you are already in expert mode, you can go directly to Step 3.
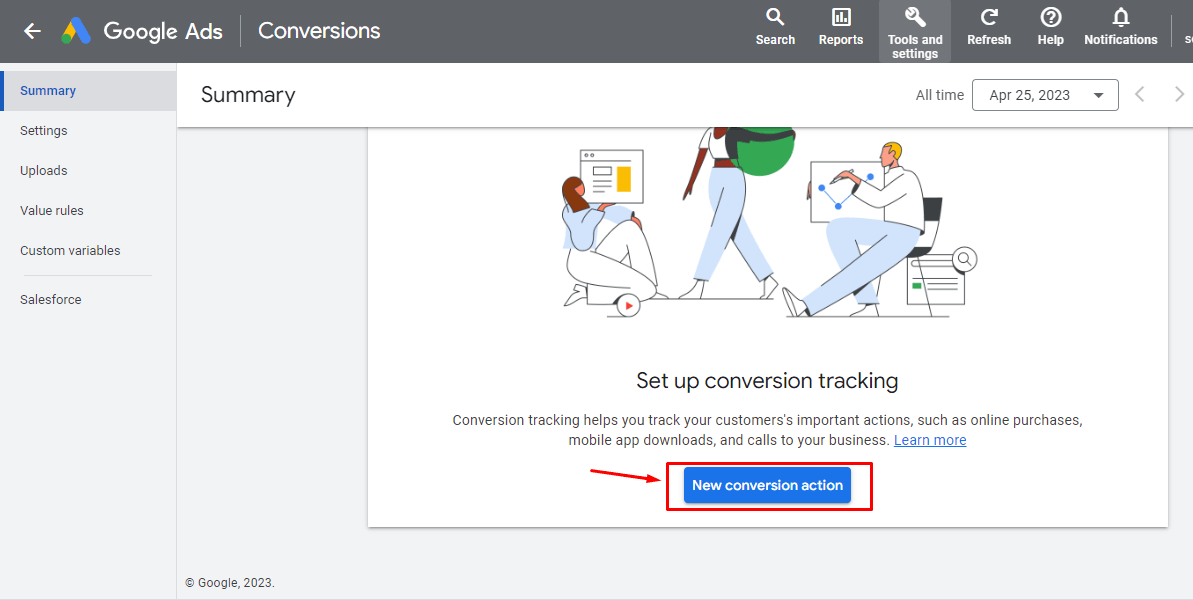
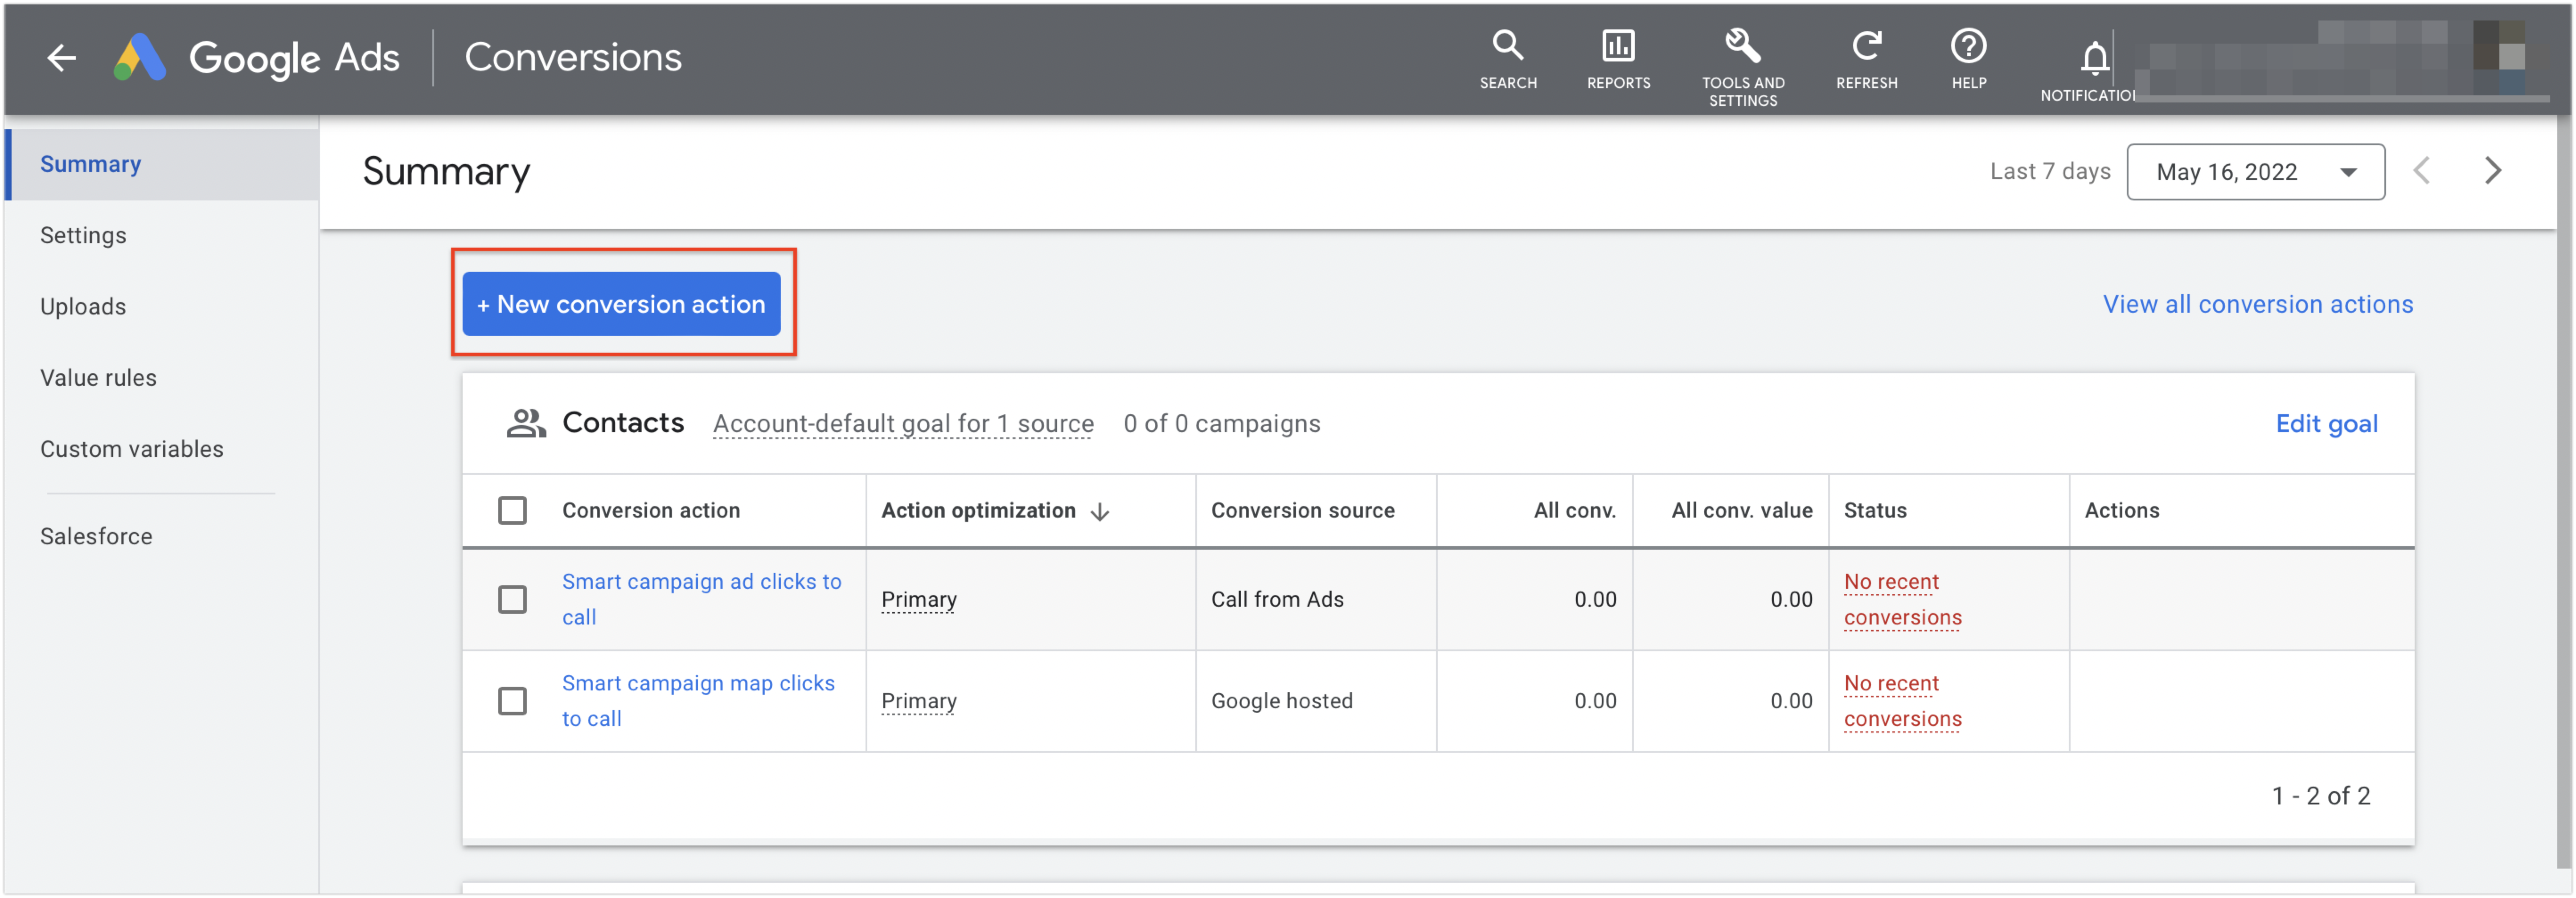
Step 3: Create a conversion action
Click [TOOLS AND SETTINGS] > [Measurement] > [Conversions] at the top right to enter the conversion action page and click + New conversion action to start adding conversion action.
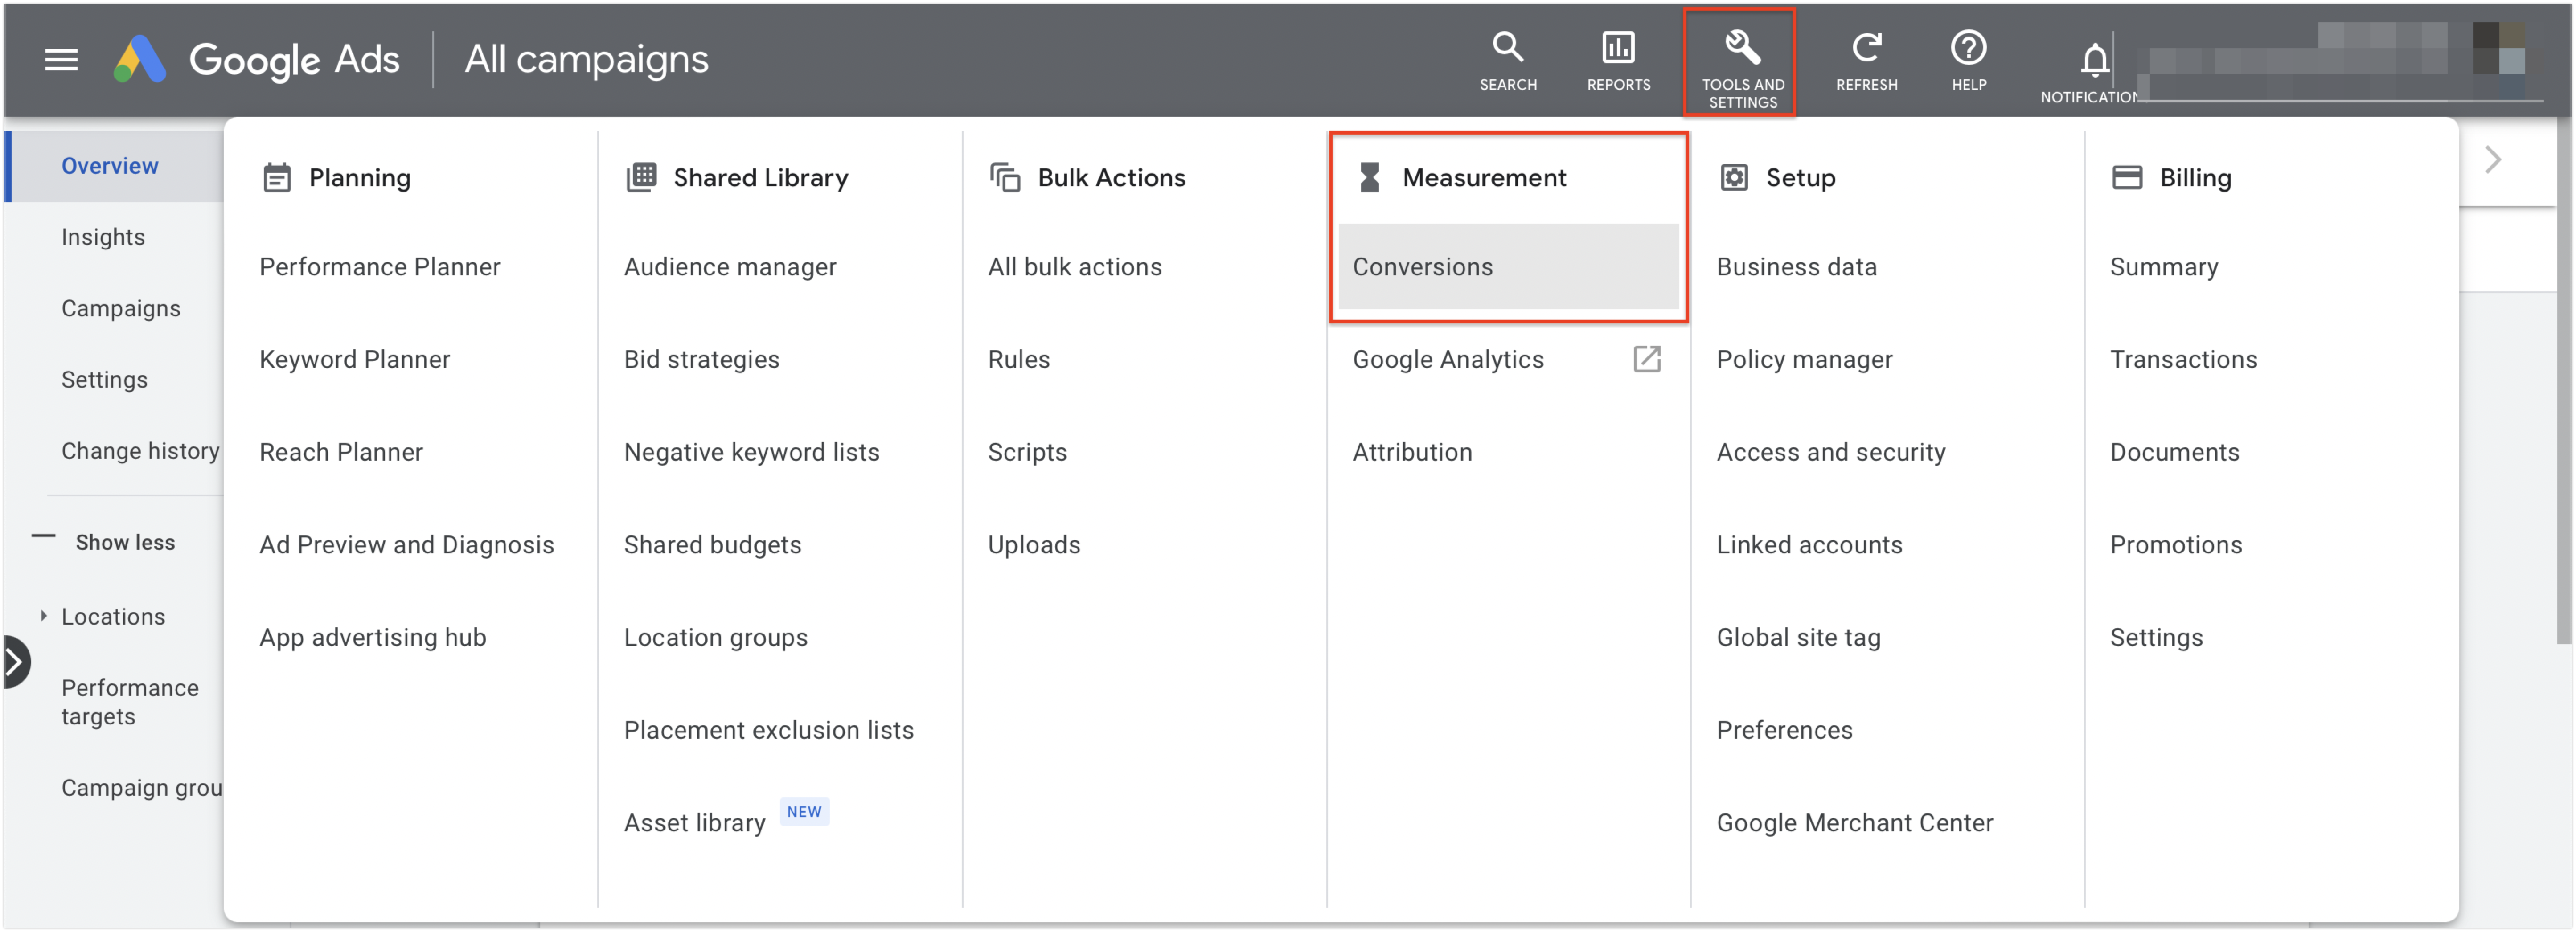
or
Google Ads’ new interface
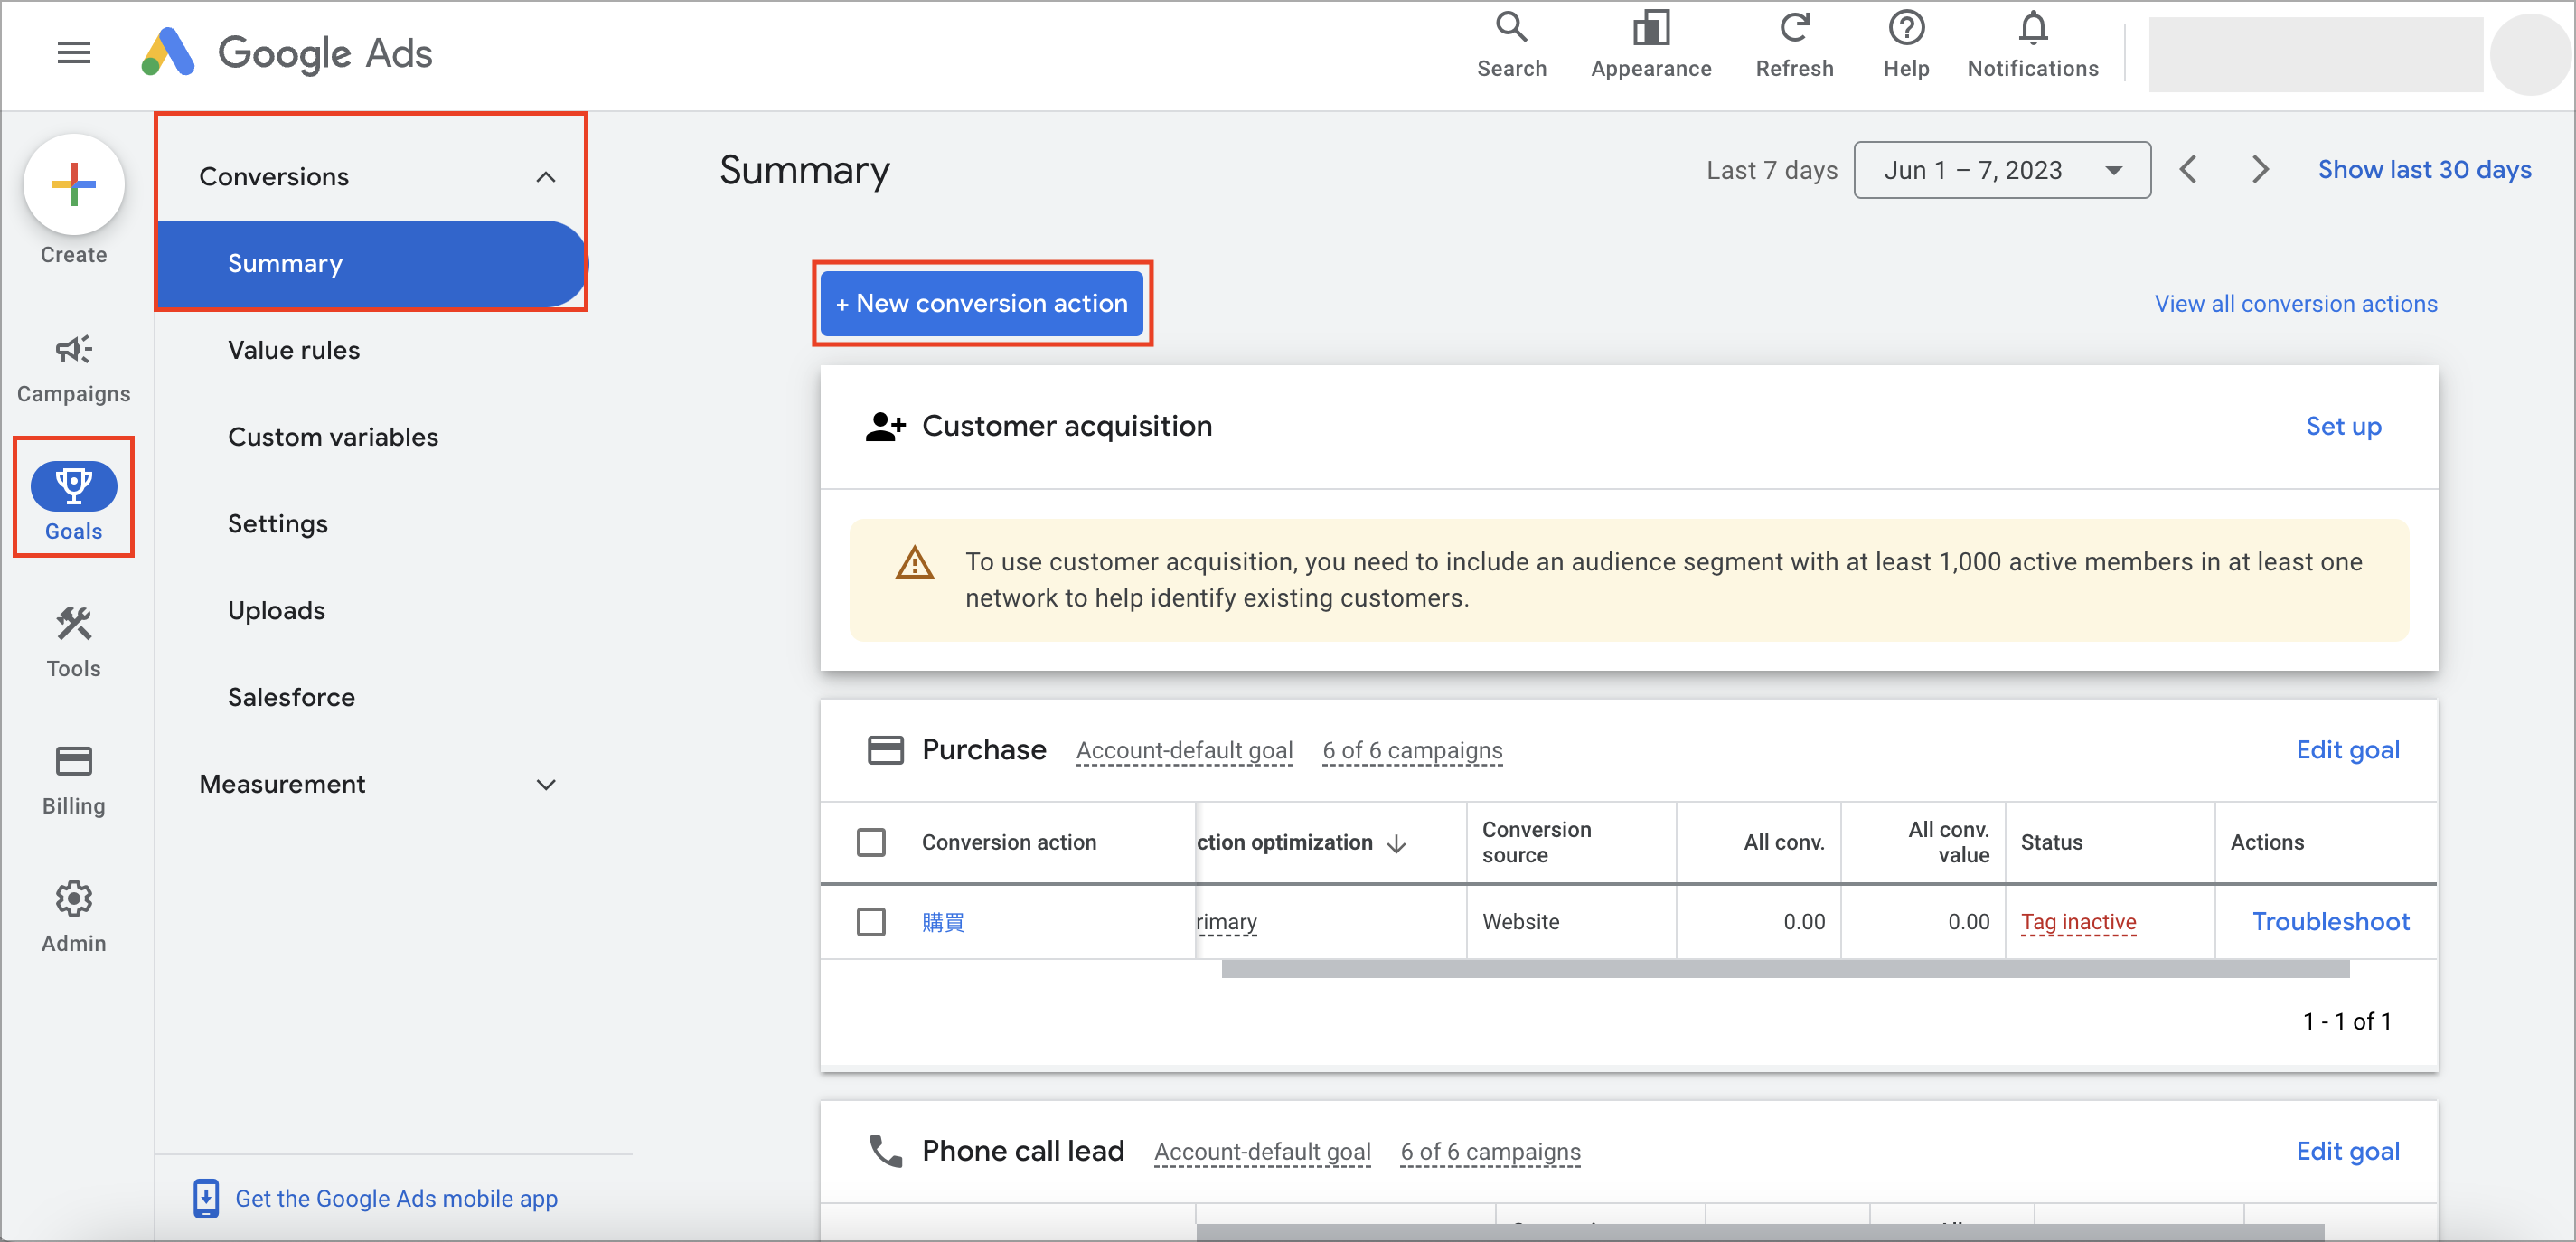
If you are using the new Google Ads interface, please go to [Goals] > [Conversions] > [Summary] on the left menu, and click + New conversion action.
Step 4: Select the kind of conversions you want to track
Usually, you can track conversions for websites, apps, and phone calls. Here we choose ‘Website’ as we need to track conversions from that.
![]()
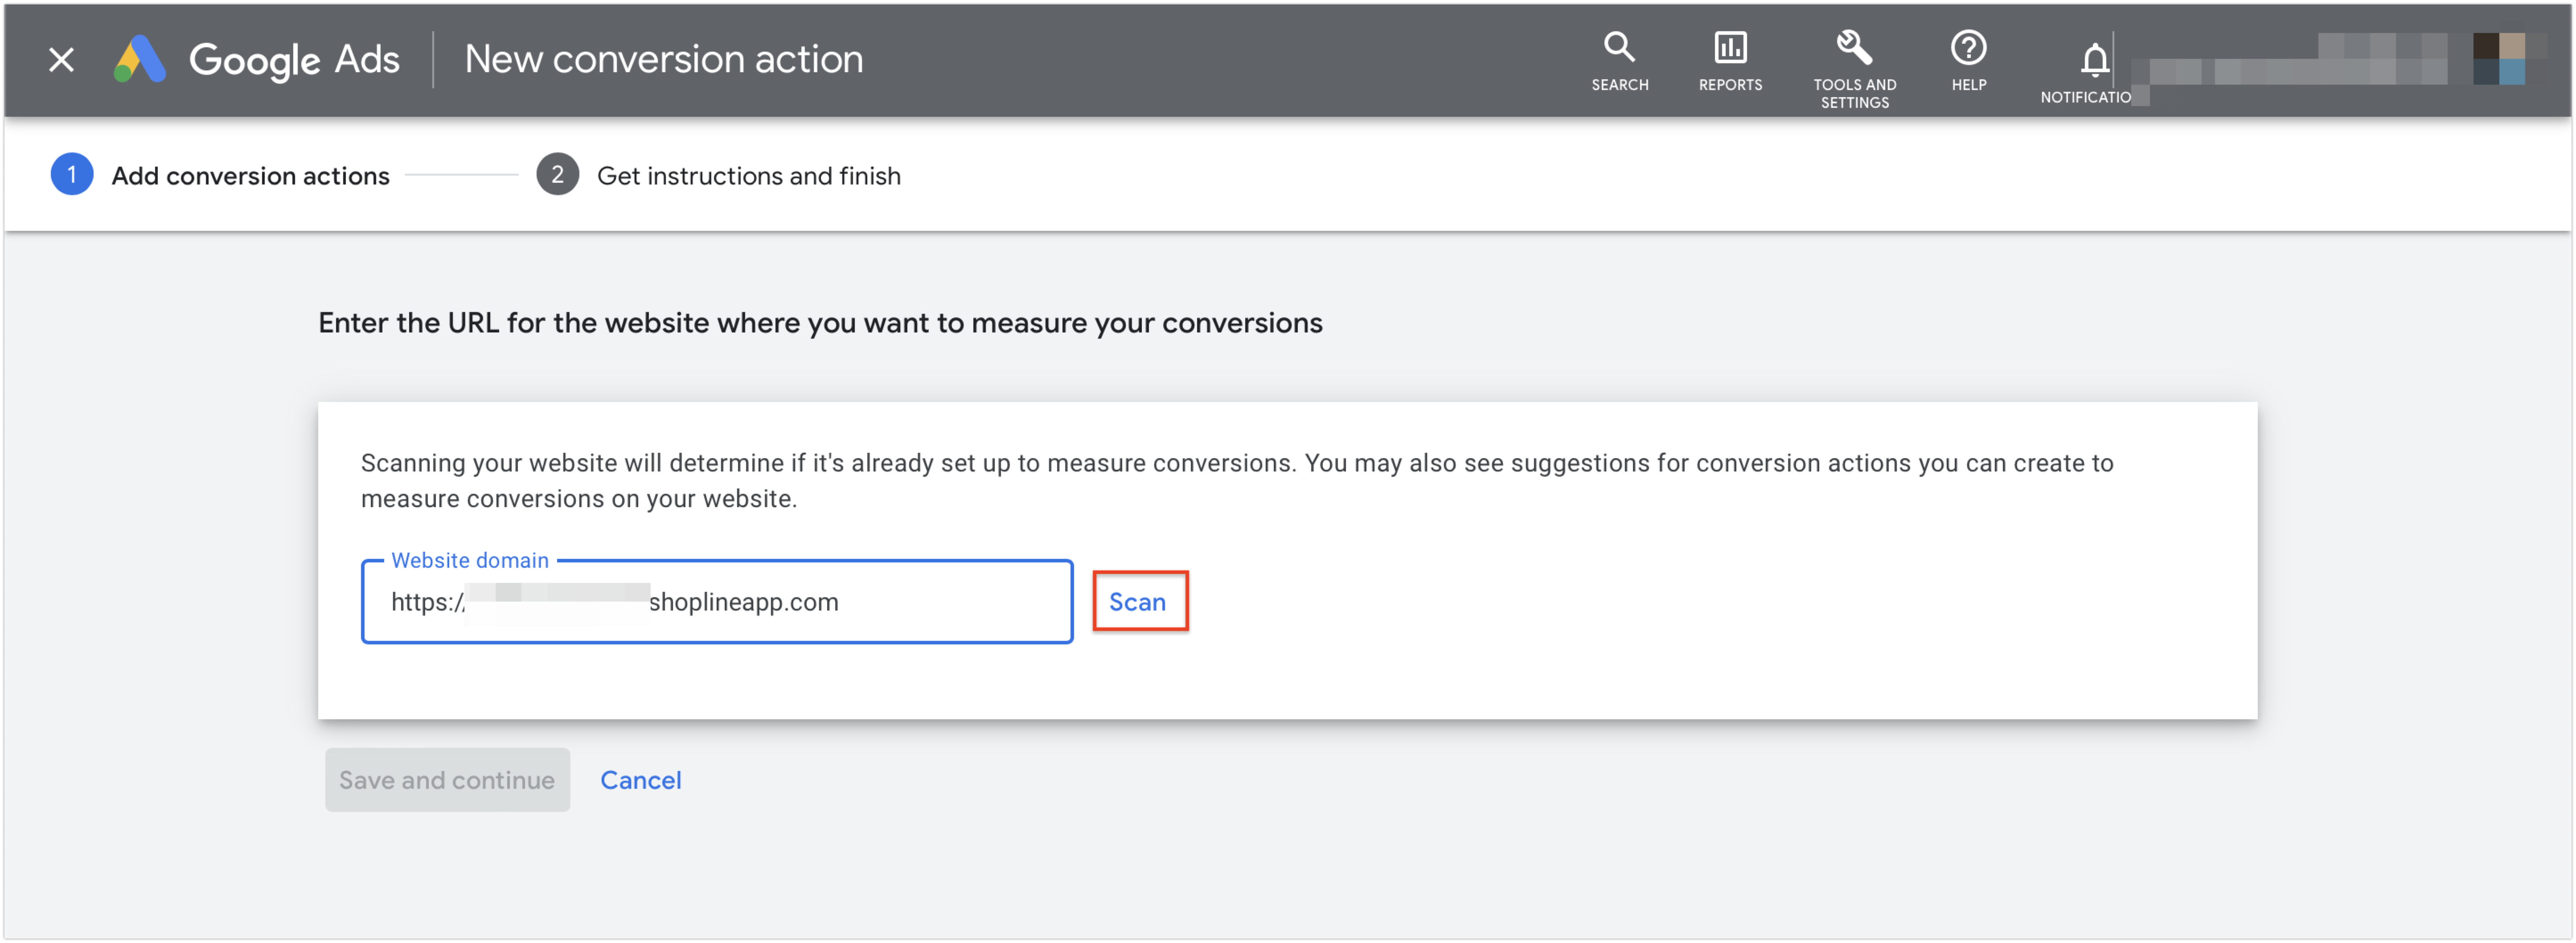
Please enter the URL of your online store, and click Scan.
Now Google Ads gives you an option to manually add your conversion action. With manual adding you can easily set the conversion action you want. For example, if you want to track ‘form sign-up’, just create a conversion action for the same.
Scroll down to “Add conversion actions manually using code,” and click the + Add a Conversion action manually button manually for subsequent settings.

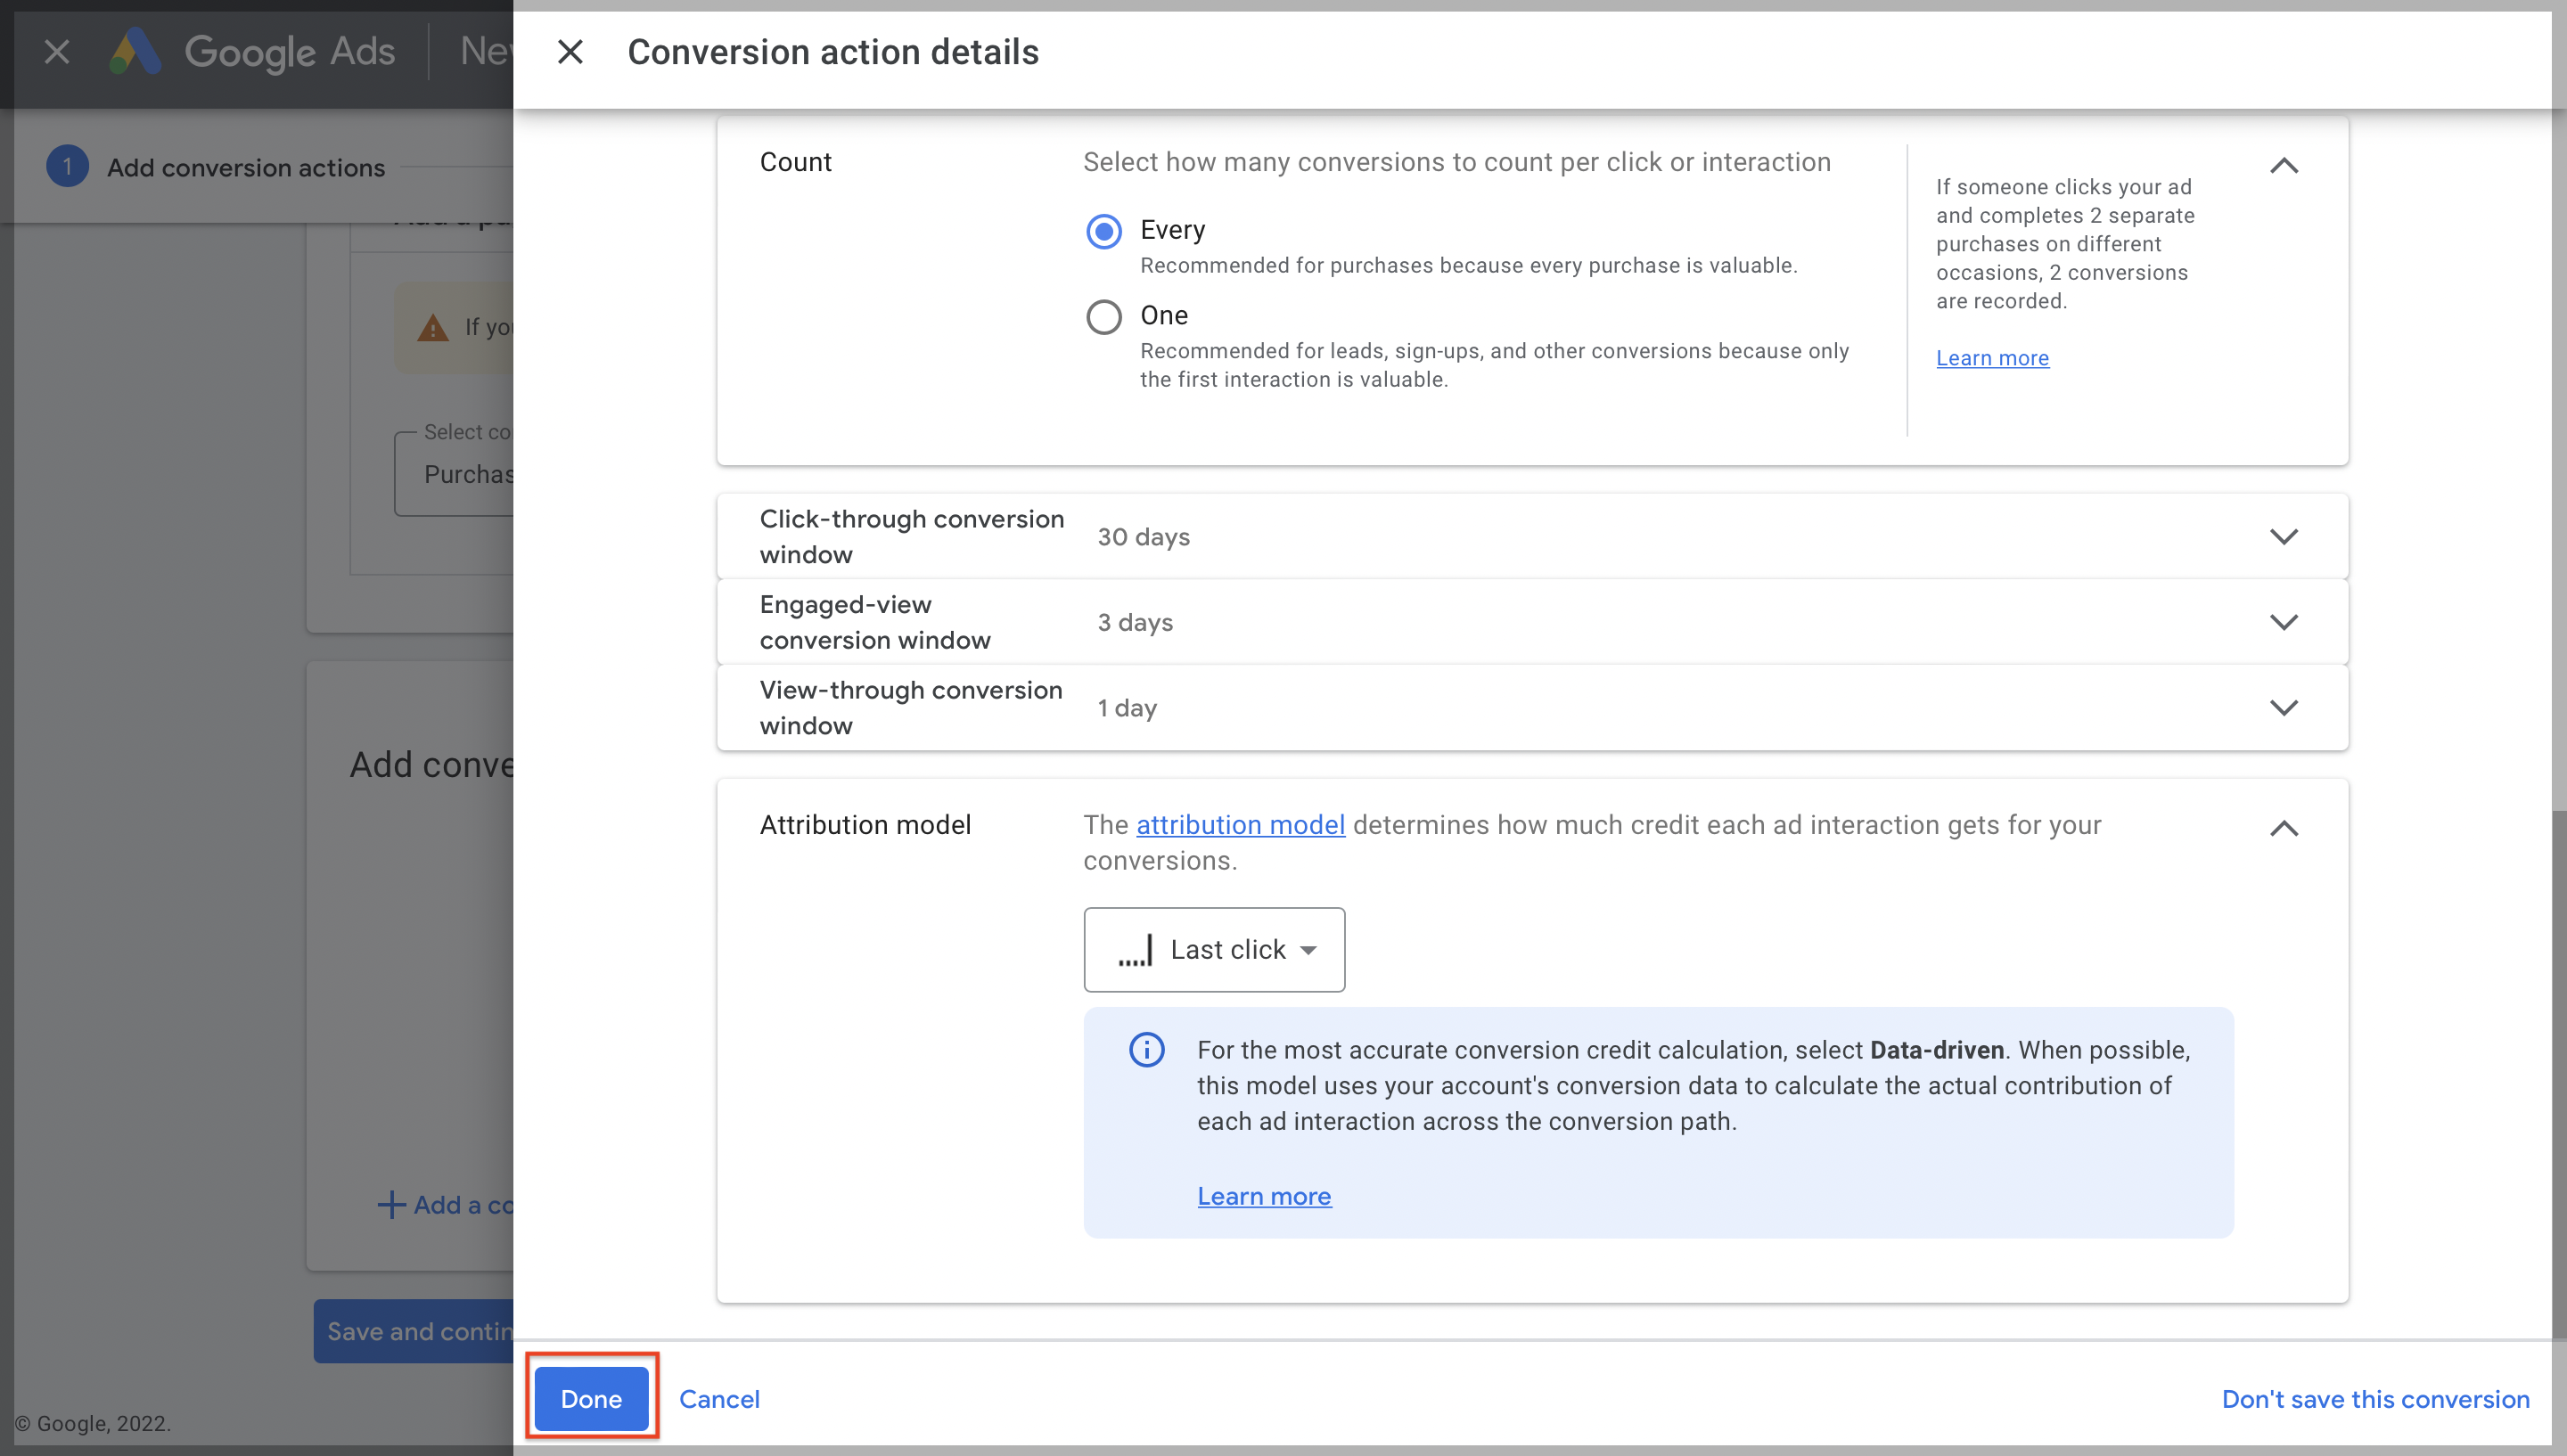
Step 5: Set up a conversion action
Please complete the settings corresponding to each field in order. Once setup is complete, please click Create and continue.
- Goal category: Purchase

- Conversion name: something you can easily identify, such as “Complete purchase.”
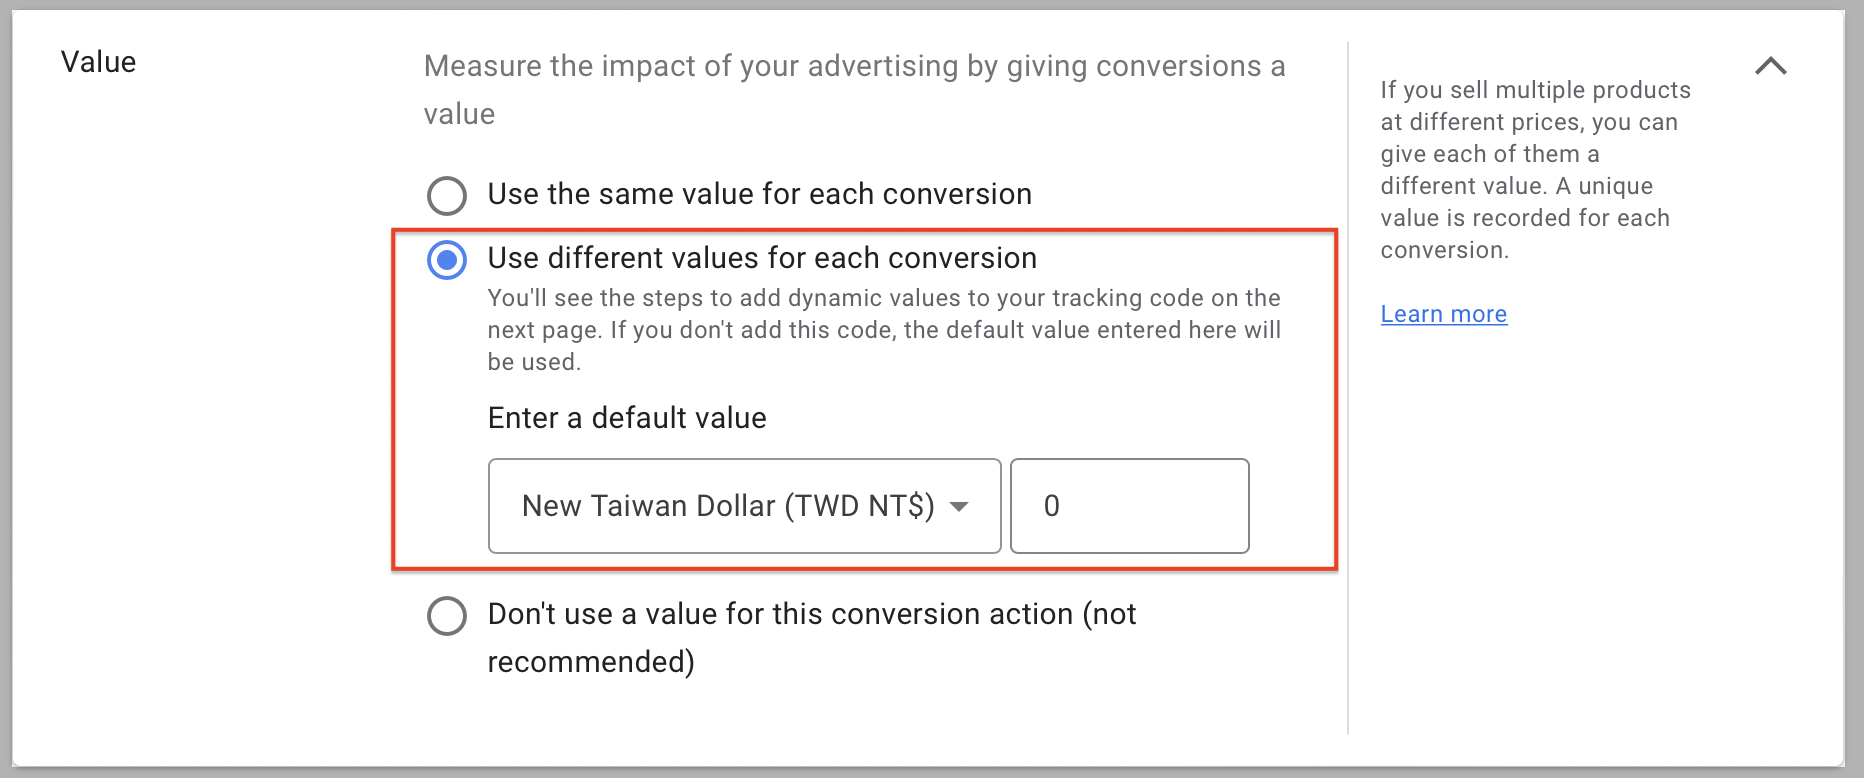
- Value: Please select Use different values for each conversion, select the currency of your store’s currency, and adjust the value to 0 (the default value is 1).
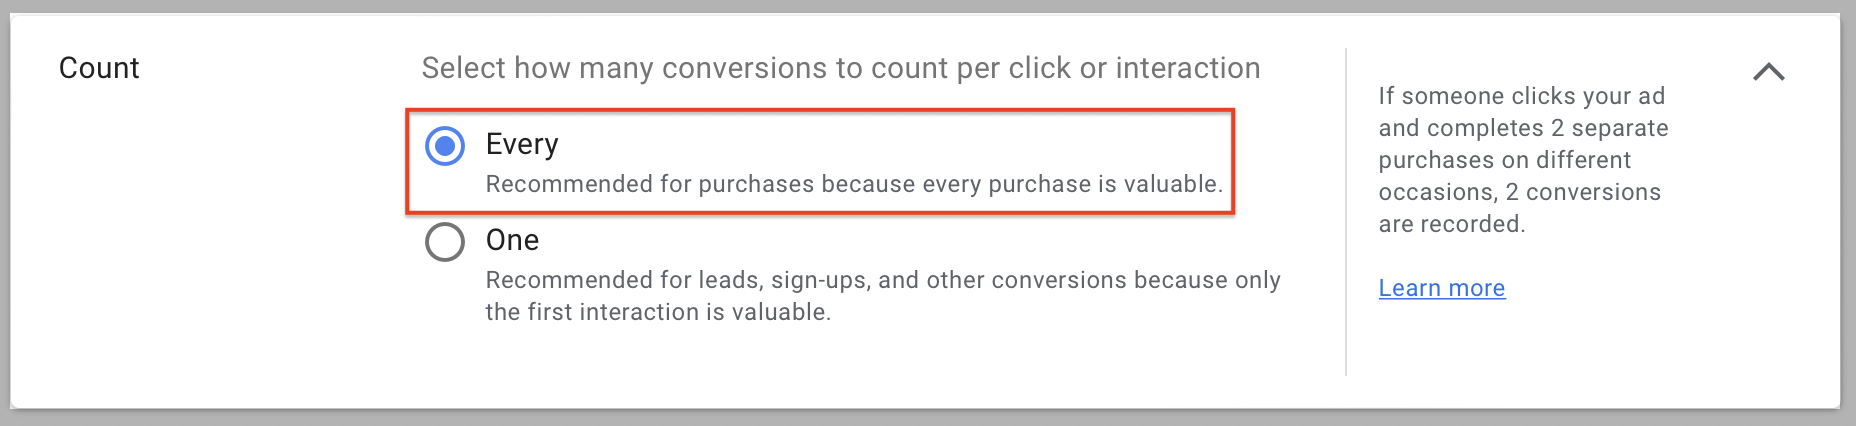
- Count: Every
- Conversion window, View-through conversion window, and Include in “Conversions”: You can adjust them according to your needs.
- Attribution model: It is recommended to select “Last click.”
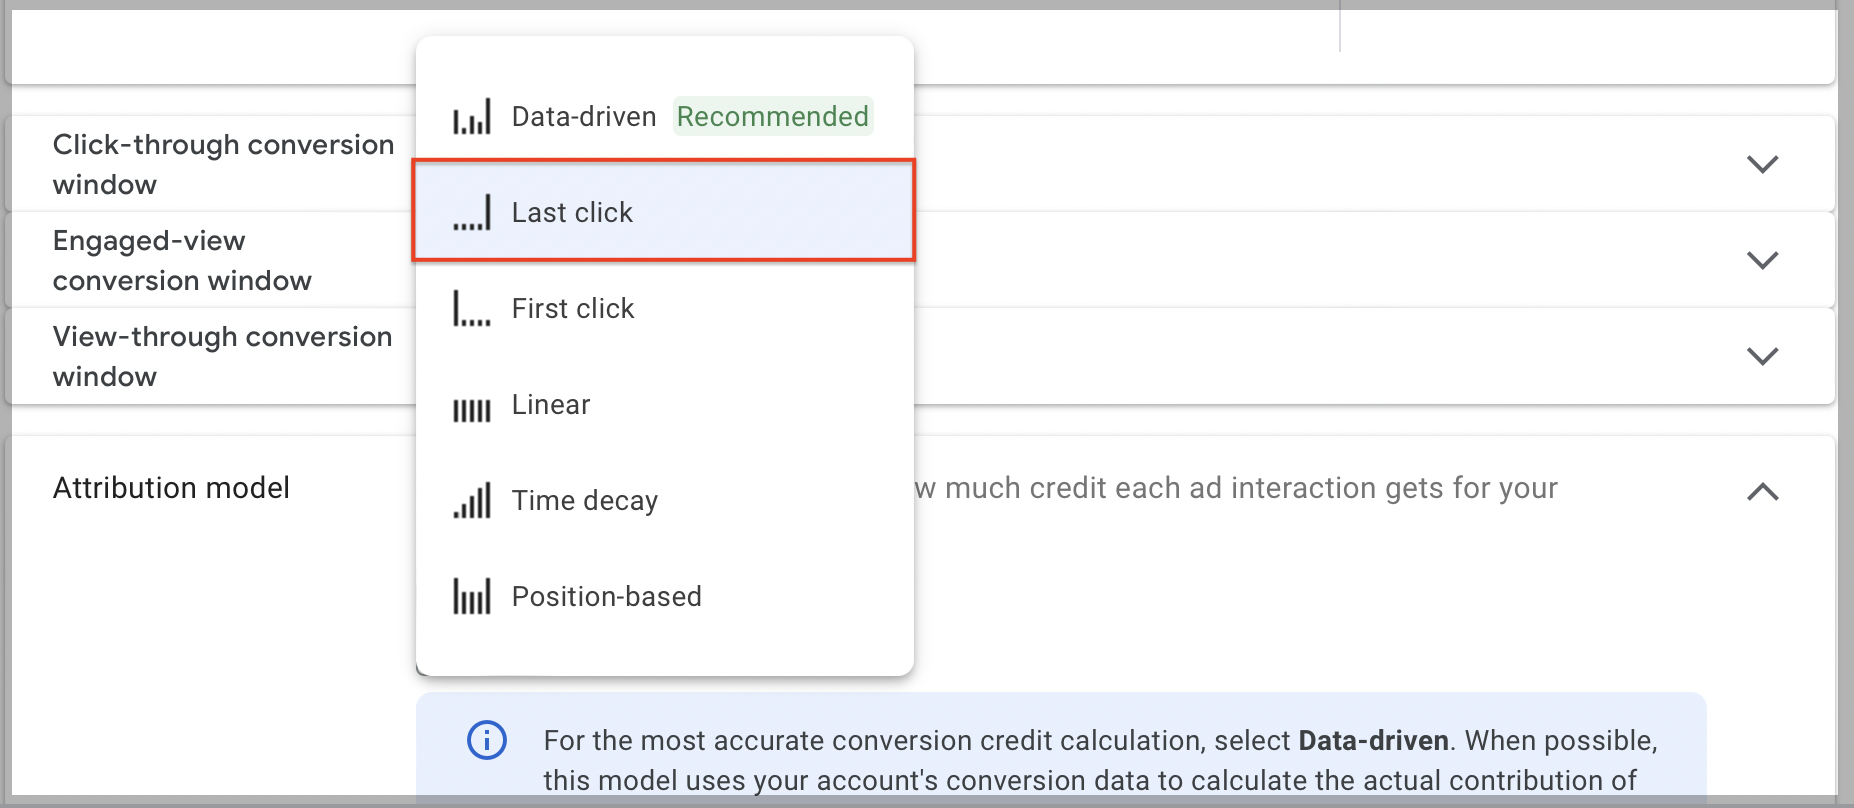
Click Done at the bottom left, click Save, and continue to apply the tag.
Step 6: Set up your Google Tag
Your next step is to set up your Google Tag. Which interface you will get is dependent on what state you are in:
- If you successfully set up a Google tag and created your conversion action: you are good at tracking conversion.
- If you haven’t set up a Google Tag, but created your conversion action: you will redirect to the Google Tag setup page as shown in the below screenshot.
Here we choose the ‘Set up with a Google tag’ method.

Once you click on the ‘Set up’ button provided on the right side, you will get the Google tag code which you need to paste on every page of your website. Ensure that only one tag is for one Google Ads account.
Step 7: Test your Google Tag
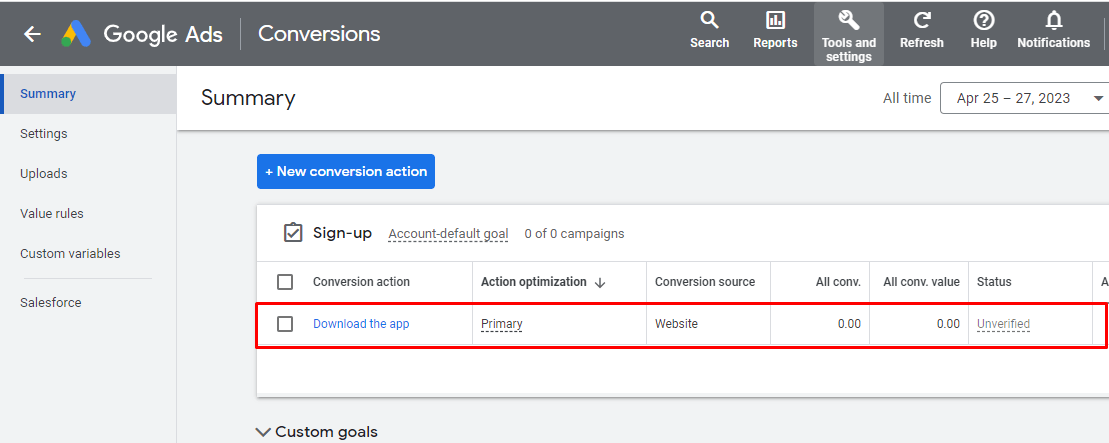
Go to your Google Ads account and go to ‘Conversions’ again. Here you will find the conversion action you have already created & ensure the status of your Google tag from there.

Step 8: Analyze Google Ads Conversion data
Once you install Google Ads conversion tracking correctly, you can track and analyze conversion data. Make sure you have added the conversion source, conversion value, and cost per conversion value into the view.
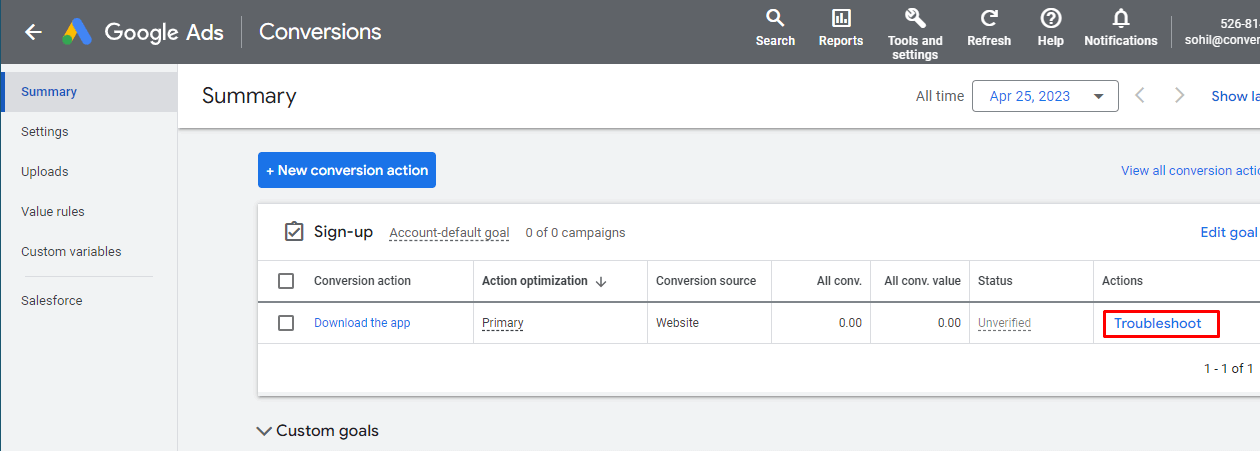
If you find any issues while installing the conversion action, you can check with the troubleshooting action.
Common Issues while setting up Google Ads Conversion tracking code
This process requires proper concentration, hence a small mistake can become a roadblock in your Google Ads conversion tracking. Let’s find out some issues, how to identify and how to troubleshoot them.
- Code placed on an incorrect page: Having the tracking code placed on the wrong page of your website. As websites have different pages, it can be a bit challenging to fetch the right page to put the code.
- An incorrect code placed on a correct page: Another common mistake is to interchange the conversion tracking code and remarketing code. Check twice before you enter the code.
- Additional script added by CMS or an application: Your browser extension might add an additional script to your code without your knowledge.
Debug the Google Ads Conversion Tracking Issues
No matter what’s the roadblock, you need to resolve it to start tracking your Google Ads conversions.
For that, in the ‘conversion action’ summary- you will get the option of ‘Troubleshoot’.
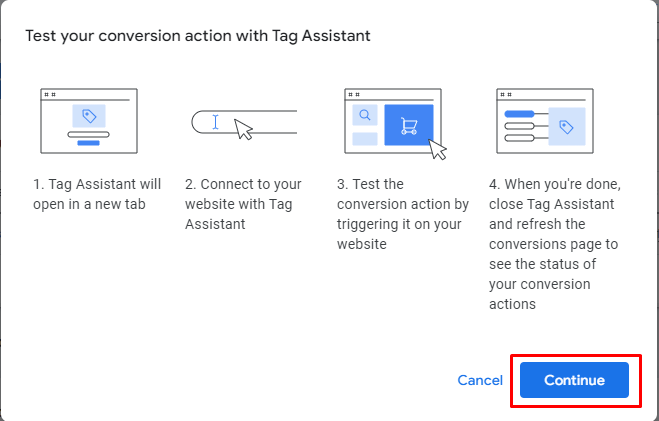
It gives you the option to test your conversion action with a tag assistant. Just click on ‘Continue’ from here.
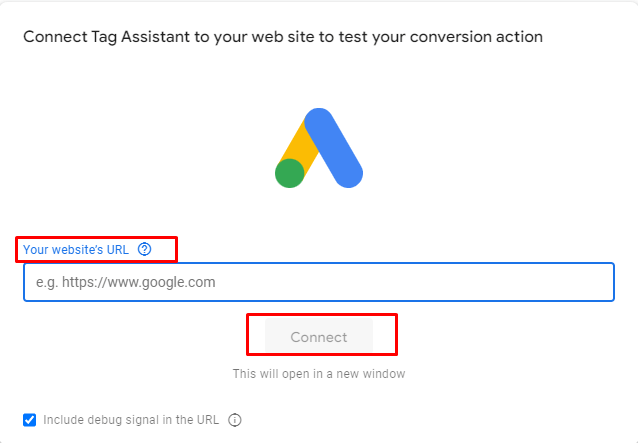
Now you have to enter your website’s URL to connect the tag assistant with your website.
Once you click on ‘Continue’- you will get the information about what can be the possible roadblock for your Google Ads Conversion tracking.
Here’s few errors are mentioned such as:
The Google tag is not found. It means you need to check your Google tag setup.
Please verify that the tag:
- Is installed on this page
- Is not being blocked ( by a browser extension or consent dialog)
Once you resolve the issues, you can track the Google Ads conversion to optimize your ad campaigns.
How to track Google Ads Conversion for E-commerce Platforms
Google Ads Shopify Conversion Tracking
If you have your store on Shopify, you can set up Google Ads Shopify conversion tracking easily. Just follow below given steps:
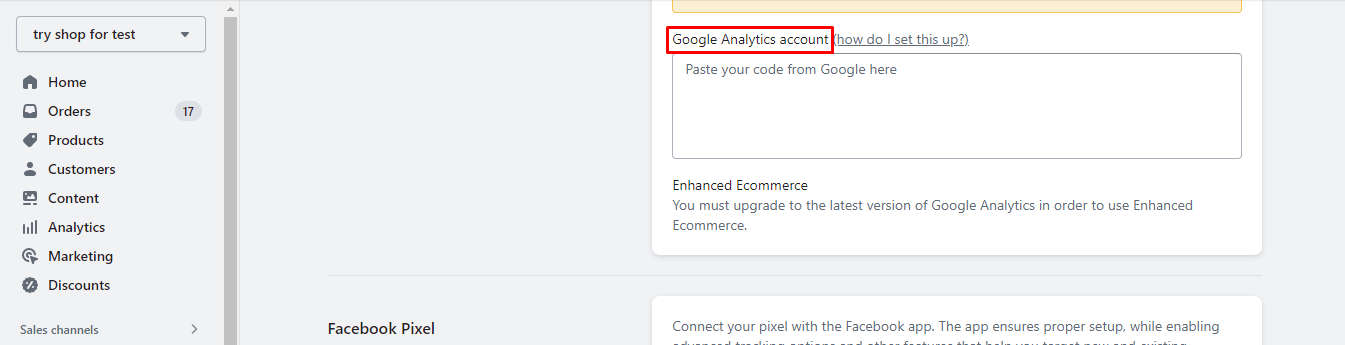
Step 1: Find Google Analytics Tracking ID
Open your Google Analytics and get the tracking ID. Navigate to ‘Settings’ > ‘Property’ > ‘Property Settings’.
![]()
Here you will find the tracking ID. Copy the tracking ID.
![]()
Step 2: Paste the Code into Shopify Store
Go to your Shopify store admin page. Click on ‘Online store’ and then click on ‘Preference’.
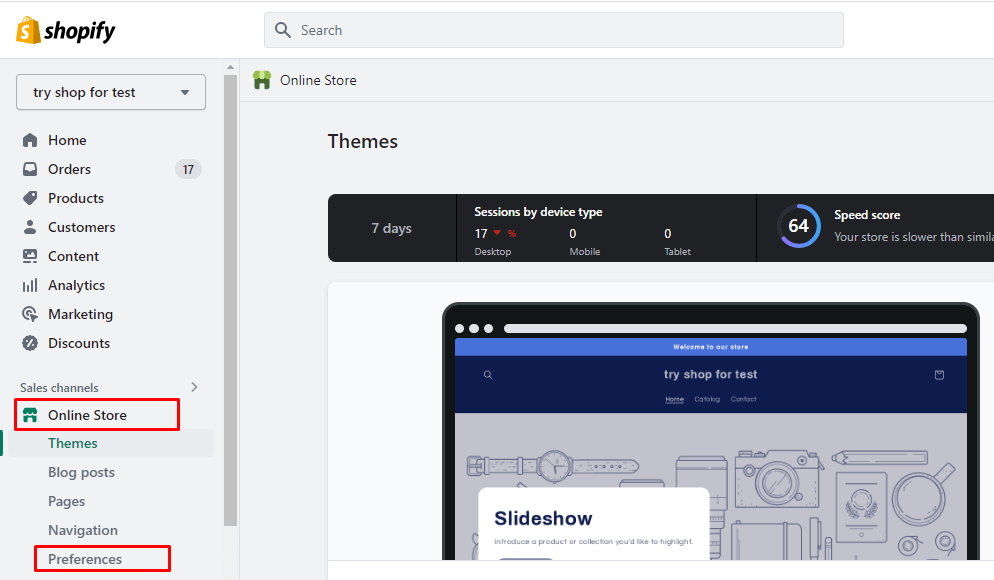
You will find an option for Google Analytics, just paste the code you have copied. Make sure you ticked the box of ‘Use enhanced E-commerce’.
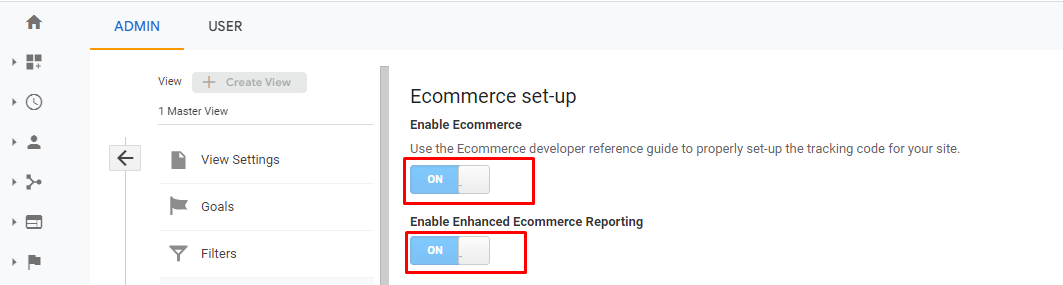
Step 3: Enable Enhanced E-commerce
Now once you are done with the above steps, go to ‘View’ in Google Analytics and click on ‘Ecommerce Settings’.
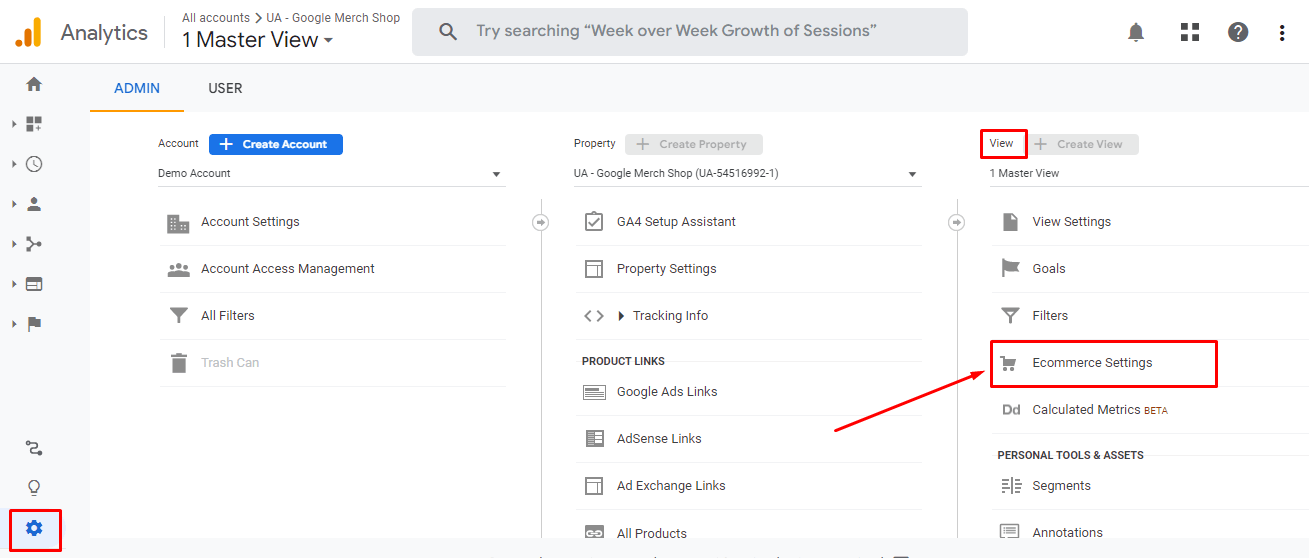
Now enable both the toggle to ‘ON’ and click on ‘Save’.
Step 4: Link Google Analytics to your Google Ads
Go to your Google Ads account. Click on ‘Tools’ and navigate to Setup > Linked accounts.
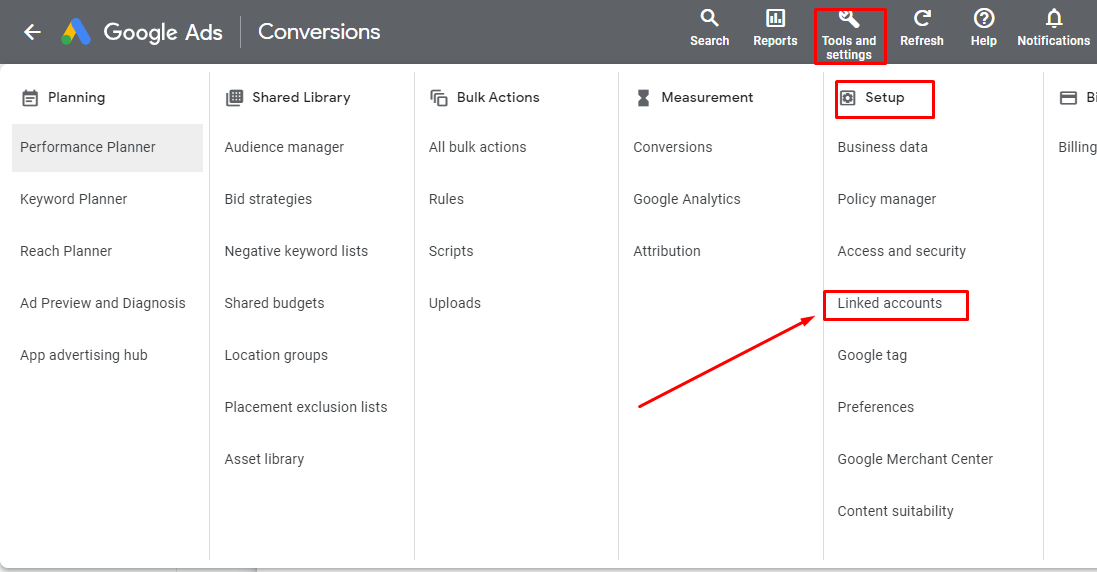
Here you will see other tools but select ‘Google Analytics’. Once you complete the prompt, you will have successfully connected your Google Analytics with Google Ads.
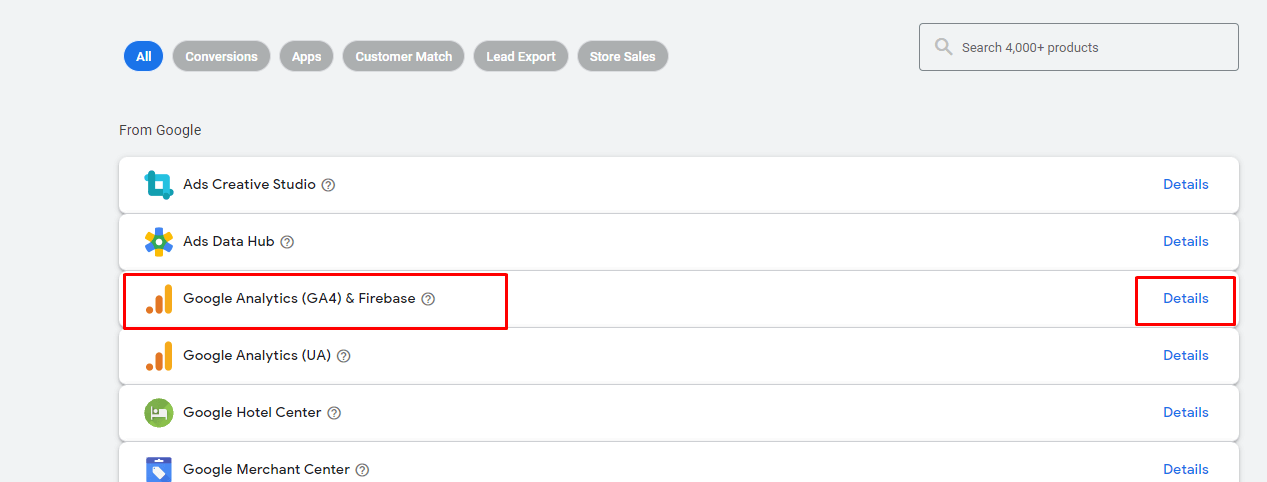
Step 5: Add new conversions in Google Ads
Go to Google Ads. Click on ‘Tools’ and then click on ‘Conversion’ under ‘Measurement’.
To create a conversion, select ‘+ new conversion action’ from here.
Now select the option of ‘Import Conversion from another system’. Complete the further process and your conversion has been added successfully.
![]()
By clicking on a specific conversion, you will see the conversion settings. Select ‘Edit settings’ and enter data based on your tracking requirements and ‘Done’.
![]()
There are other benefits of Google Ads conversion tracking that can help you grow your business and improve decision-making.
Google Ads Magento Conversion Tracking
Many of you have your store on Magento, it’s easier to set up Google Ads conversion tracking for you too.
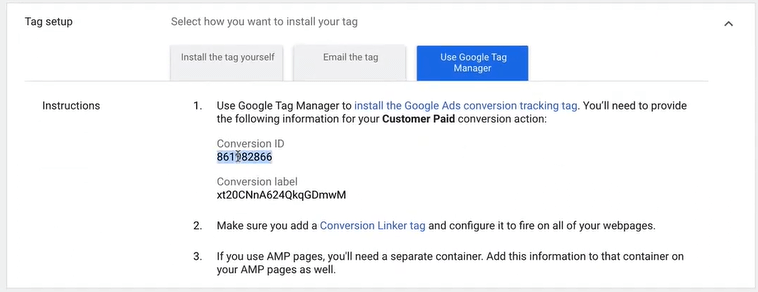
Step 1: Create Conversion in Google Ads
Here we have to start with the step of ‘Google Ads Shopify conversion tracking’. Go to your Google Ads account. Make sure you choose, website instead of import.
![]()
Once you created the conversion in Google Ads, click on it and scroll down to the ‘Tag setup’. By clicking on ‘Use GTM’ you will get the Conversion ID.
Step 2: Add Conversion to your site with GTM
Go to ‘Google Tag Manager’ and click on ‘Triggers’. Now create a tag here and finish the process to continue.
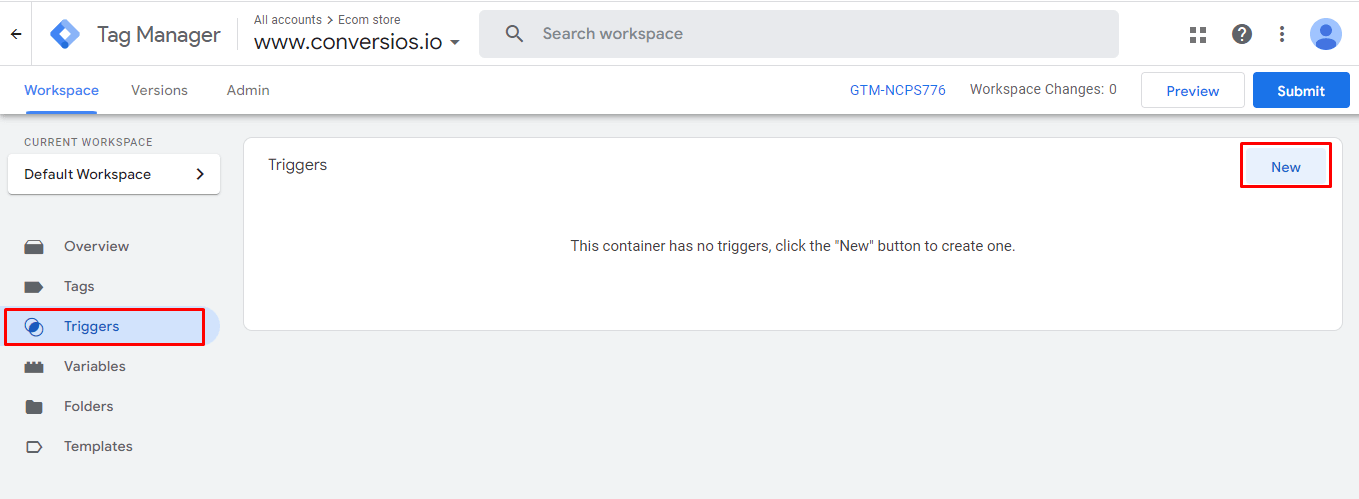
Now navigate to ‘Tags’, create a new tag, and proceed to the ‘Tag Configuration’.
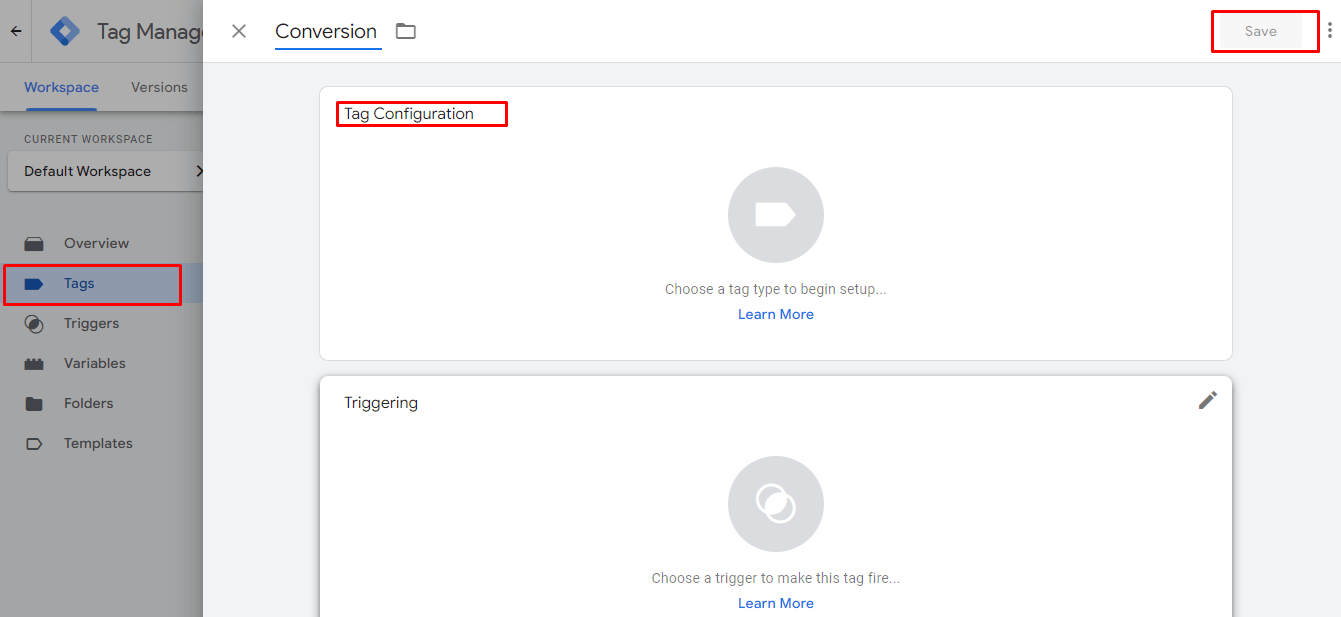
You will see the multiple options, now select ‘Google Analytics conversion tracking’.
![]()
Enter details based on your requirements, and click on ‘Submit’.
Step 3: Configure Magento 2 Store
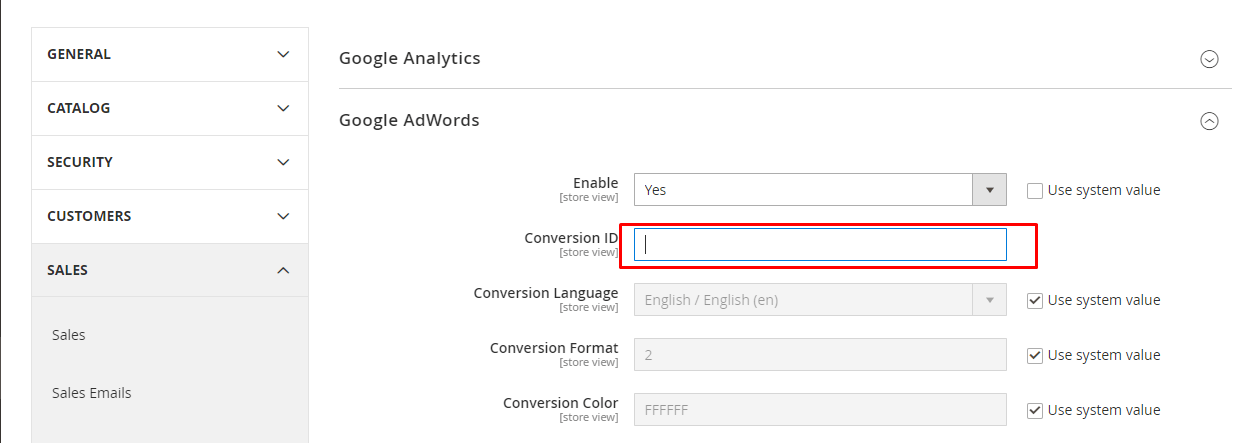
To configure conversion, go to your Magento store admin section. Follow the given path: Stores > Configuration > Sales > Google API.
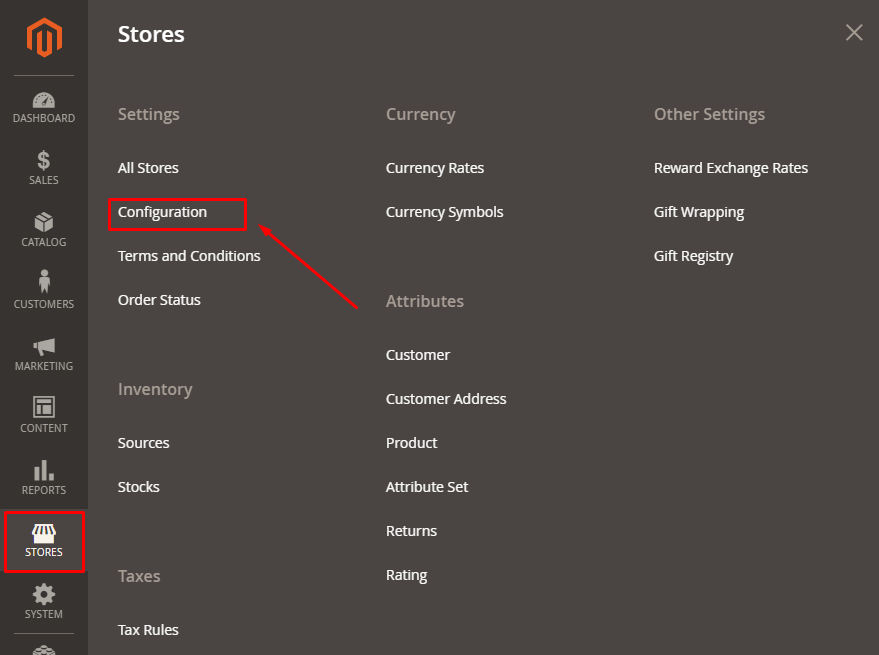
Here you will get the option of ‘Google Ads’. Enable the option and enter the ID to move forward.
Step 4: View Results
The final step is to check the results. For that, you have to go to Google Ads. Navigate to Conversions.
Here you will see the Conversion action for which you want to set up Google ads conversion tracking. It will show you important data such as tracking status, All conversions, All conversion values, etc. To check the data directly from the dashboard, go to ‘Overview’ and click on ‘Clicks’. Now you can choose the conversion action and track the data here.
Google Ads WooCommerce Conversion Tracking
To set up Google Ads conversion tracking for WooCommerce, follow the below-given steps:
Step 1: Create Conversion in Google Ads
Start with creating conversion action in Google Ads. Get the conversion ID from here and move to step 2.

Step 2: Install Plugin from the WordPress store
Go to your WordPress backend and go for ‘Plugin’ and ‘Add new’. Then find Plugin to Install
Step 3: Configuration Plugin to track conversion rate
Go to your WordPress backend and go for ‘Plugin’ and ‘Add new’. Then find Plugin to Install
Conclusion
You can get useful insights into your ads and optimize them for optimal results with Google Ads Conversion Tracking. By following the simple steps outlined in this guide, you can set up conversion tracking like a pro. Maximize the effectiveness of your advertising efforts.
Now, you must know how. Google Ads Conversion Settings effective MarkKnow hopes that each step of the above instructions will help you create an excellent strategy for your business operations. Stay updated with more topics and ways to make new, Creative and specialized videos to find your competitive advantage.
Comment Policy: We truly value your comments and appreciate the time you take to share your thoughts and feedback with us.

Note: Comments that are identified as spam or purely promotional will be removed.

To enhance your commenting experience, consider creating a Gravatar account. By adding an avatar and using the same email here, your comments will feature a unique and recognizable avatar, making it easier for other members to identify you.

Please use a valid email address so you can receive notifications when your comments receive replies.