However, the 4TB HDD containing the movies is still in the PC, it cannot be attached to the Dell 7040M with Proxmox installed because it does not support 3.5-inch hard drives. Therefore, I have to find a way to set up a connection from the Linux virtual machine with Plex installed to the movie folder on Windows 10. Then I can configure the movie library on Plex.
The Sharing feature on Windows works based on the SMB / CIFS protocol. I will set up a connection to the Samba server on Linux to be able to access the movie folder on Windows 10.
Samba server is a file-sharing server used in the internal network, based on the SMB (Server Message Block) protocol. The SMB protocol is also known as CIFS (Common Internet File Sharing) when it was inherited by Microsoft and integrated into the Windows operating system.
1. Set up Sharing on Server
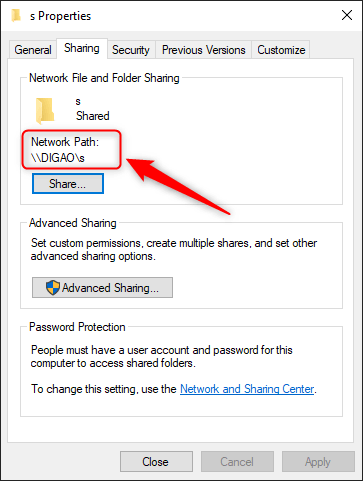
I need to set up Sharing for the Entertainment folder on Windows by right-clicking on the folder -> select Properties -> Sharing -> Click the Share button to enable sharing for the folder.

2. View the list of shares on the Samba server
Install samba client on Linux
sudo apt install smbclientCode language: Nginx (nginx)List shared folders on Samba server
smbclient -L //192.168.0.100
Code language: Nginx (nginx)
Replace 192.168.0.100with the IP address of the Server you are trying to connect to.
The system will ask you to enter a password to connect as below.
root@ubuntu:~# smbclient -L //192.168.0.100
Enter WORKGROUP\root's password:Code language: Bash (bash)
However, Ubuntu defaults to connecting using username root, which does not exist on Windows. I had to edit the command and add the suffix--user=USERNAME
smbclient -L //192.168.0.100 --user=thuanbuiCode language: Nginx (nginx)Enter the password of the account thuanbuion Windows 10, I get the sharing list as below
root@ubuntu:~# smbclient -L //192.168.0.100 --user=thuanbui
Enter thuanbui's password:

	Sharename       Type      Comment
	---------       ----      -------
	ADMIN$          Disk      Remote Admin
	C$              Disk      Default share
	D$              Disk      Default share
	E$              Disk      Default share
	Entertainment   Disk
	F$              Disk      Default share
	IPC$            IPC       Remote IPC
	Linux-Distros   DiskCode language: Shell Session (shell)
Write down the name of the shared folder you need to connect to. For example, here I need to connect to the Entertaiment folder.
3. Connect Samba Share to the directory
Install package cifs-utils:
sudo apt install cifs-utilsCode language: Nginx (nginx)Create a new folder on Ubuntu and connect the share folder to it
sudo mkdir /mnt/Entertainment
sudo mount -t cifs -o username=thuanbui //192.168.0.100/Entertainment /mnt/<meta charset="utf-8">Entertainment/Code language: Nginx (nginx)
Note that you need to change the username, IP address and Samba Share name accordingly.
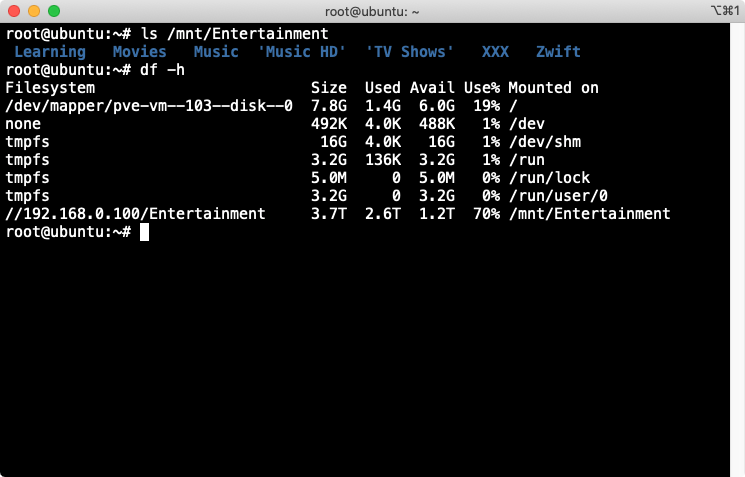
Check again with the command lsand df -hyou will see that the Entertainment folder on Windows 10 has been successfully connected to the folder /mnt/Entertainmenton Ubuntu.

4. Automatically connect to Samba Share on startup
The connection in the above step will be lost every time Ubuntu reboots. To maintain a permanent connection to the Samba Share, we need to edit the file again.fstab
sudo vi /etc/fstabCode language: Nginx (nginx)Place the following line at or near the bottom of the file:
//<ip-address>/<mount-name> /mnt/Entertainment/ cifs username=YOURUSERNAME,password=YOURPASSWORD,iocharset=utf8,file_mode=0777,dir_mode=0777
Code language: JavaScript (javascript)
(Remember to change the parameters to suit your settings)
Restart Ubuntu, and check again with the command df -h, you will see the samba share folder has been automatically connected to the folder on the system.
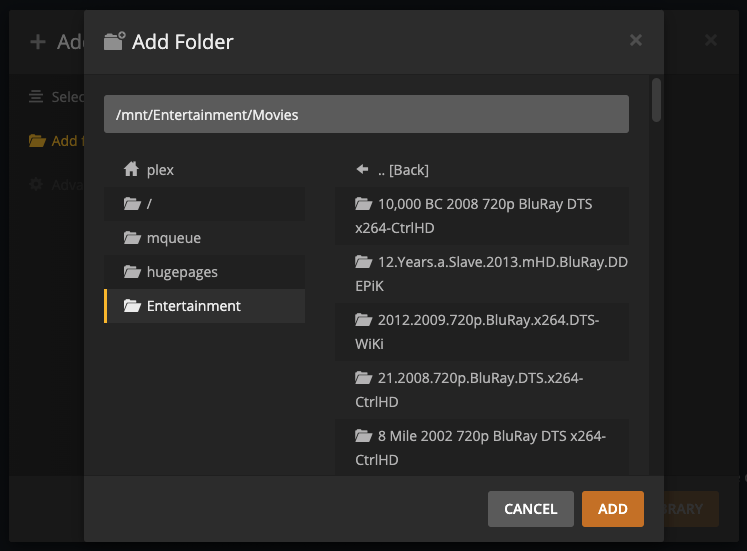
Once setup was complete, I was able to access Plex and set up the movie folder in the folder/mnt/Entertainment/Movies

Comment Policy: We truly value your comments and appreciate the time you take to share your thoughts and feedback with us.

Note: Comments that are identified as spam or purely promotional will be removed.

To enhance your commenting experience, consider creating a Gravatar account. By adding an avatar and using the same Email here, your comments will feature a unique and recognizable avatar, making it easier for other members to identify you.

Please use a valid email address so you can receive notifications when your comments receive replies.
