
To begin studying Laravel, one of the first steps is to install Laravel on your personal computer. On macOS, I use Herd. For a quick and easy setup, I had to research how to install a development environment using WSL2 combined with Docker Desktop and Laravel Sail to suit the setup currently used at my company.
In this article, I will share a guide on how to set up a Laravel environment on Windows 11.
I. Installing and configuring WSL2
1. Activate WSL2
Open PowerShell/Terminal with administrator privileges: press Windows + X, select “Windows PowerShell (Admin)” or Terminal (Admin).
Install WSL:
wsl --install Code language: Nginx (nginx)If virtualization is not enabled on your computer, you need to go into the BIOS to enable it (usually Intel VT-x or AMD-V).
2. Install Ubuntu from the Microsoft Store
Open the Microsoft Store, search for “Ubuntu”. Install and launch Ubuntu.
The first time you run it, you will be asked to create a username and password (save them as you will need them later).
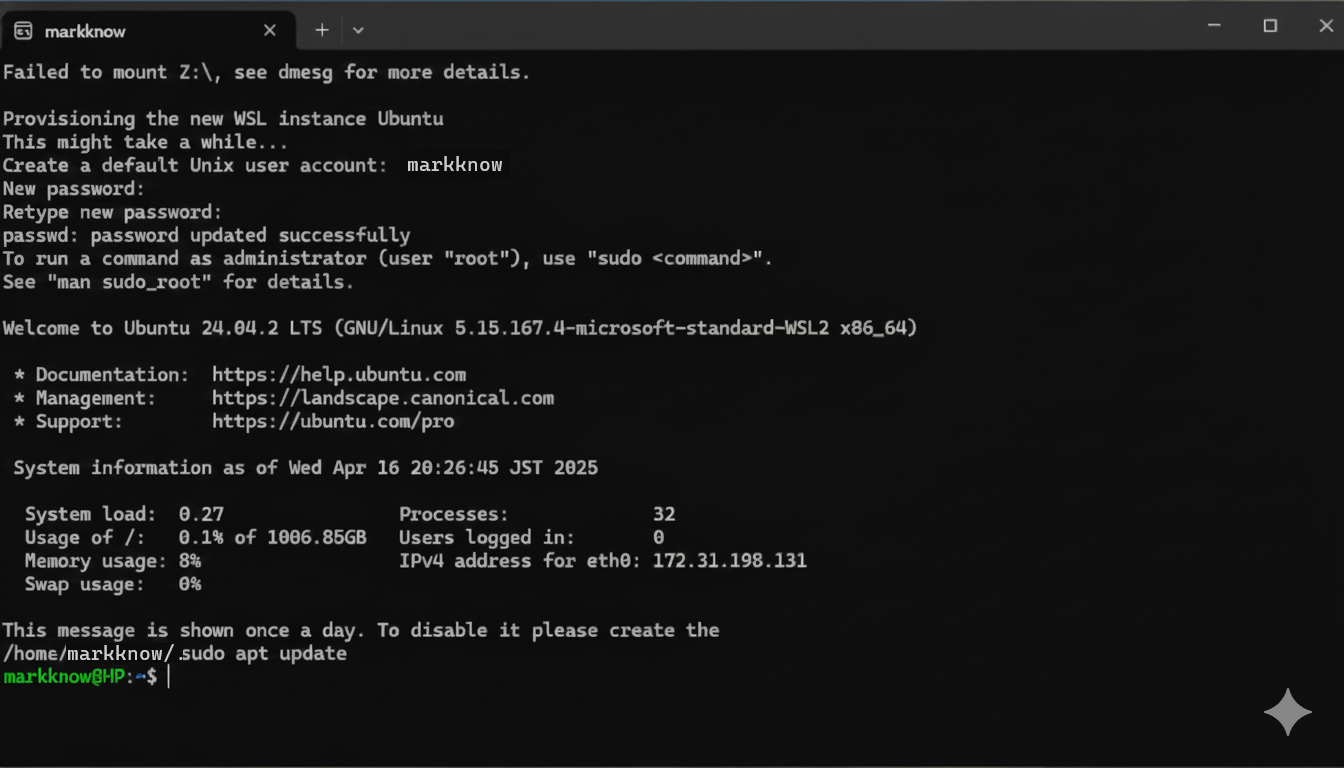
Then restart the computer.
3. Update WSL2
In PowerShell, make sure WSL2 is the default version:
wsl --set-default-version 2Check the WSL version by:
wsl --list --allYou will see Ubuntu listed, usually with signs
wsl --set-default Ubuntu Code language: JavaScript (javascript)II. Installing Docker Desktop
1. Install using Chocolatey
Quick and easy installation using Chocolatey . Open Terminal (admin) and enter this command:
choco install docker-desktop Code language: Nginx (nginx)2. Enable WSL2 integration in Docker Desktop
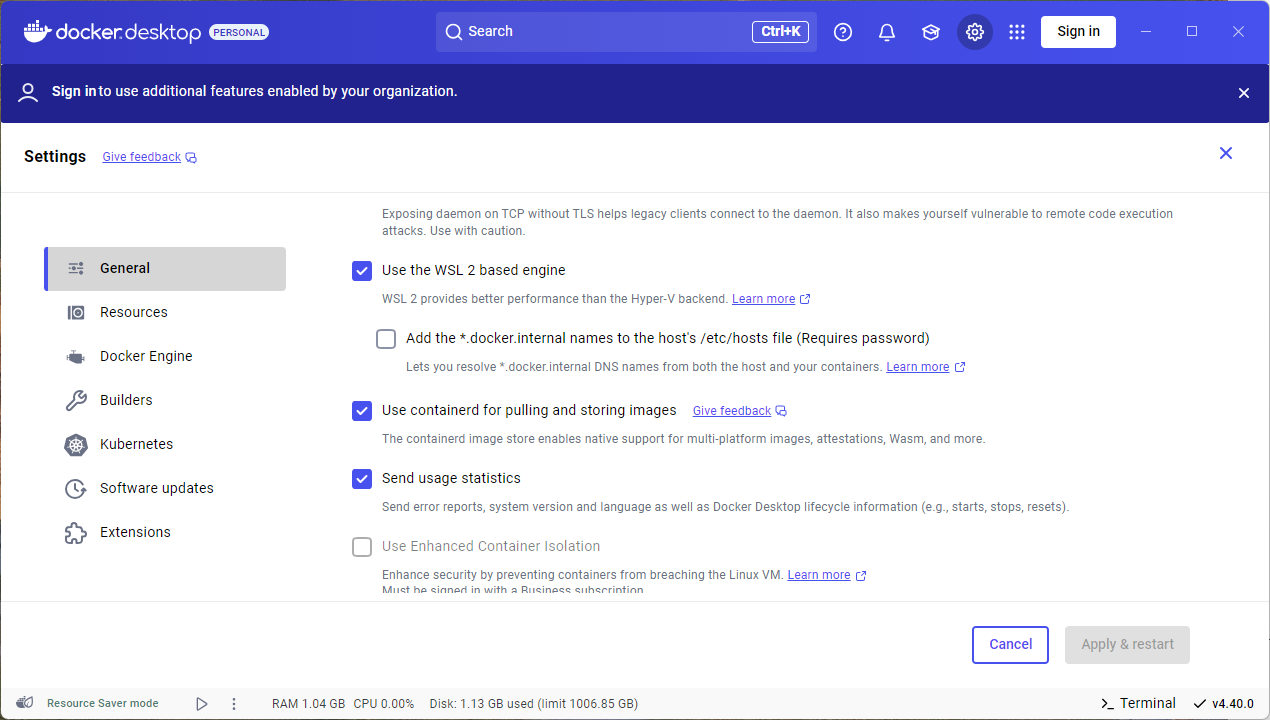
Open Docker Desktop, go to Settings > General , and select Use the WSL 2-based engine.
Go to Settings > Resources > WSL Integration , enable “Enable integration with my default WSL distro” and select Ubuntu from the list.
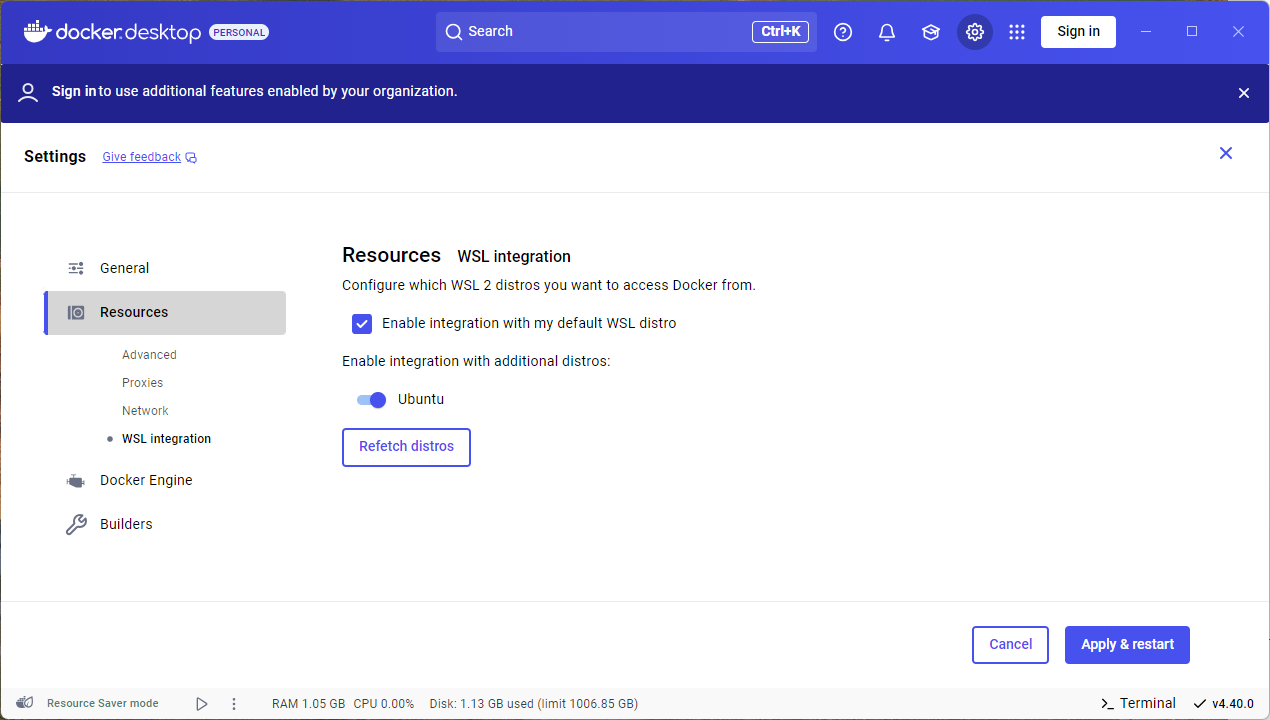
Press Apply & Restart
3. Check Docker:
Open the Ubuntu terminal (from the Start Menu or type the command wslin the Terminal).
Run the command:docker --version
If you see the Docker version (e.g., Docker version 28.0.4), you have successfully installed and integrated Docker with WSL2.
IV. Creating a Laravel project with Sail
Laravel Sail is a development tool provided by Laravel that allows us to easily run Laravel projects using Docker without needing to install PHP, MySQL, Composer, etc., directly on our machines.
1. Create a new Laravel project.
In the Ubuntu terminal, create a new directory to save your Laravel projects:
mkdir -p ~/laravel && cd ~/laravel Code language: JavaScript (javascript)Run the following command to create a Laravel project with Sail:
curl -s "https://laravel.build/test" | bash Code language: Nginx (nginx)Replace `test` with the name of your desired project. This command will automatically download Laravel and configure Sail. The installation process will take approximately 5-10 minutes, depending on your internet connection and computer configuration. You may need to enter your previously set Ubuntu password for the system to complete the installation.
After the installation is complete, this message will appear.
Thank you! We hope you build something incredible. Dive in with: cd test && ./vendor/bin/sail up Code language: Bash (bash)3. Activate with Sail
Move to the newly created folder after installation
cd testStart Sail:
./vendor/bin/sail up -dThe first time Sail runs, it will load Docker containers (this may take a few minutes depending on your network speed).
Next, run the following command to create the necessary tables for the database.
./vendor/bin/sail artisan migrate4. Project review
Open your browser and go to http://localhost.
If you see the Laravel welcome page, the installation was successful!

To turn off Sail when not in use:
./vendor/bin/sail downV. Integration with VS Code
I’m using VS Code to code Laravel. Here’s the additional configuration to integrate with WSL.
- Install the WSL extension in VS Code.
- Open VS Code, press Ctrl + Shift + P, and select “WSL: Connect to WSL”.
- To open the project folder in VS Code, using the Ubuntu Terminal, navigate to the project folder and type the following command:
code . - Install some useful extensions for Laravel.
Now you can code Laravel directly in VS Code, integrated with WSL2 and Sail.
VI. Some tips when working with Sail
- Customizing services : Files
docker-compose.ymlin the project directory allow you to add or remove services (such as Redis, Mailhog). See details at https://laravel.com/docs/sail. - Run the Artisan command : Instead of using
php artisan, we will use the command:./vendor/bin/sail artisan - Check containers : To see which containers are running:
docker ps - Free up memory : If Docker is taking up too much space, run:
docker system prune
VII. Conclusion
I just showed you how to install Laravel on Windows 11 using WSL2, Docker Desktop, and Laravel Sail. This combination saved me configuration time and ensured a consistent development environment for the team.
Happy Coding!
Source: https://blog.dogcomp.com/kickstart-your-laravel-10-using-laravel-sail-wsl2-1bd4e24c27cc
Comment Policy: We truly value your comments and appreciate the time you take to share your thoughts and feedback with us.

Note: Comments that are identified as spam or purely promotional will be removed.

To enhance your commenting experience, consider creating a Gravatar account. By adding an avatar and using the same e-mail here, your comments will feature a unique and recognizable avatar, making it easier for other members to identify you.

Please use a valid e-mail address so you can receive notifications when your comments receive replies.