I just moved from Toyama to Osaka, and had to move through the new Internet service provided by Sony. Sony Nuro offers very impressive speed-the basic package has reached 2Gbps (the actual speed I measured about 1Gbps with Wi-Fi 6), compared to the NTT Flet’s Hikari optical cable service when measuring only about 300Mbps.
However, after the installation is complete, I discovered: Sony Nuro uses MAP-E technology, a special form of NAT (similar to CG-NAT) designed to share IPv4 addresses among many users. As a result, the familiar features for Homelab such as opening Port (Port Forwarding) or DMZ will no longer be valid. It means that I cannot access from the outside to the internal network service at home via public IPv4 address as usual.
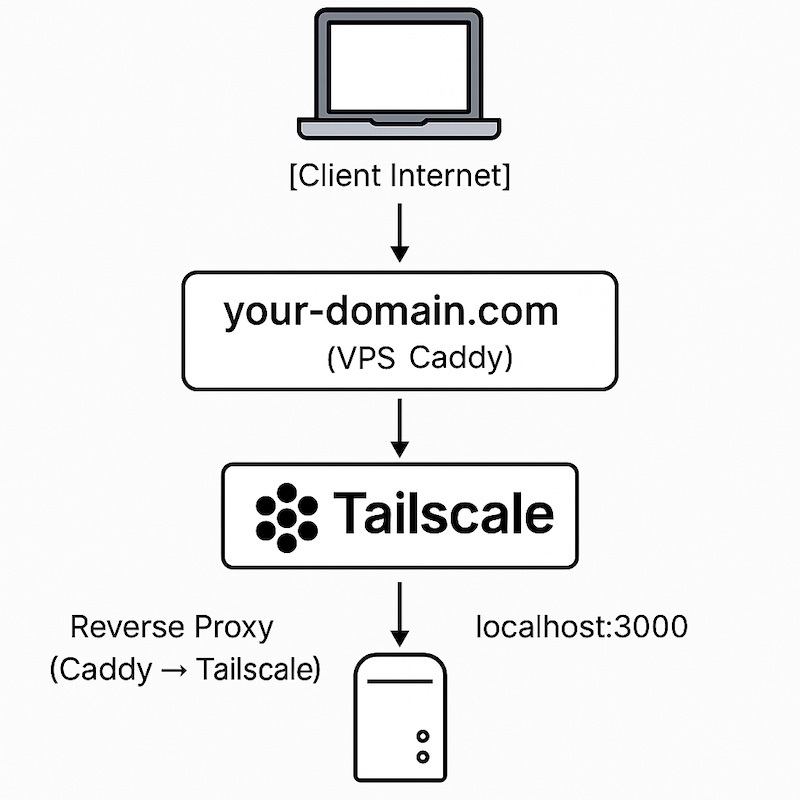
To simplify the setup, I will use the new option: combining Tailscale and Caddy Server installed on VPS.
The connection model will be as below
I. Install Tailscale
Refer to the article below to better understand Tailscale and how to install.
1. On the internal server (Proxmox, NAS …)
Run the following command on the internal server to install Tailscale. I installed on 1 LXC of Proxmox
curl -fsSL https://tailscale.com/install.sh | shCode language: Nginx (nginx)Activate Tailscale
sudo tailscale up --advertise-routes=192.168.0.0/24Code language: Nginx (nginx)Parameter --advertise-routes=192.168.0.0/24: Notify Tailcale that this node (LXC Container) Can access to the entire internal LAN (including NAS, Camera, etc.). You need to replace 192.168.0.0/24 By subnet is using the internal LAN.
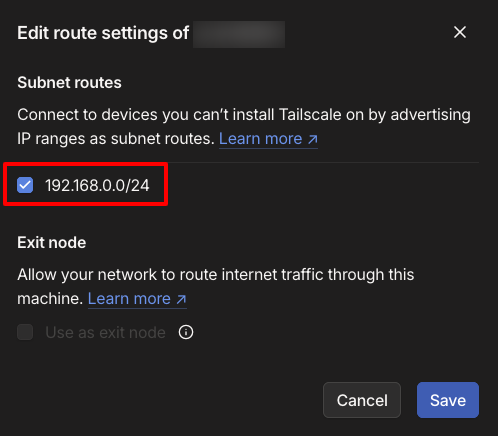
Access to Tailscale’s management page: admin.tailscale.com go to Machines tab, select Node LXC you just installed. The subnets, you will see the Awaiting Approval section, click on Edit.
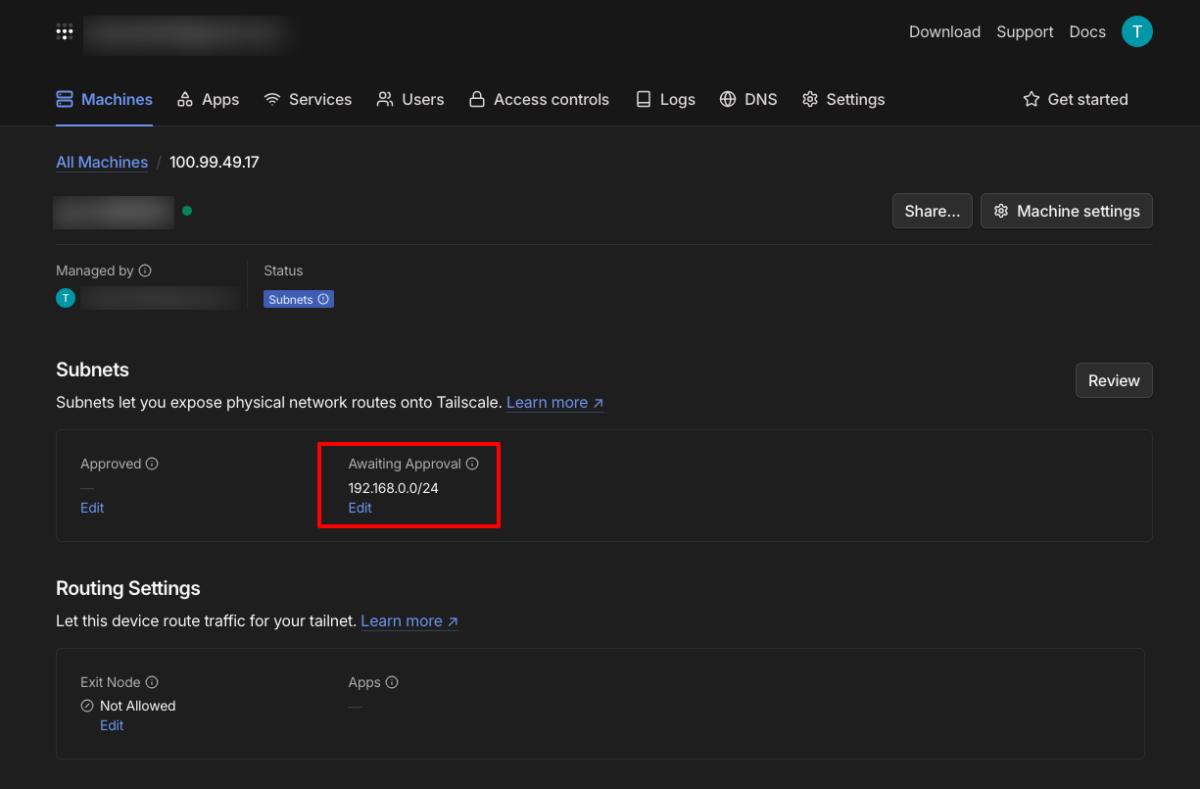
Tick to the end of the subnet 192.168.0.0/24 and click Save to confirm Tailscale Net has access to the internal LAN 192.168.0.0/24 Through the LXC node.
2. On VPS
Similarly, install Tailscale by the following command
curl -fsSL https://tailscale.com/install.sh | shCode language: Nginx (nginx)Activate tailscale with command
sudo tailscale up --accept-routesCode language: Nginx (nginx)Parameter --accept-routes To allow VPS to access the subnet 192.168.0.0/24 has been set earlier.
II. Check the connection between VPS and internal network
Access SSH to VPS and Ping to any NAS or VM in the internal network. For example:
ping 192.168.0.50Code language: CSS (css)If Ping is successful, the connection of Tailscale has worked as desired.
III. Set caddy server on VPS
I already have CADDY server running on Docker on Homelab at home, now just bring the entire setup to VPS is done.
CADDY SERVER
cd ~/caddy
docker compose downCode language: Bash (bash)
Then rsync the entire CADDY folder on VPS
cd ~
rsync -avz caddy root@IP-VPS:~/.Code language: Nginx (nginx)Activate Caddy on VPS
cd ~/caddy
docker compose up -dCode language: Bash (bash)If you set the CADDY server from the beginning, refer to the article below:
Configure Caddy as Reverse Proxy for network services in homelab
IV. Domain to VPS
Visit the DNS management page (Cloudflare, Namecheap …), update the records of the domain names pointing to the IP of Homeserver into the VPS IP.
Wait a few minutes for Caddy to complete the creation of SSL certification. After that, I can access network services at home through the domain name as usual.
That’s it!
Comment Policy: We truly value your comments and appreciate the time you take to share your thoughts and feedback with us.

Note: Comments that are identified as spam or purely promotional will be removed.

To enhance your commenting experience, consider creating a Gravatar account. By adding an avatar and using the same e-mail here, your comments will feature a unique and recognizable avatar, making it easier for other members to identify you.

Please use a valid e-mail address so you can receive notifications when your comments receive replies.